Plum Tarte Tatin


I have what I would call a mini garden on my balcony. There is a cherry tomato plant, some basil, thyme, oregano, parsley, chives, and some pretty purple flowers. I love stepping out there and grabbing fresh herbs for whatever I’m cooking. I would love to have the space for more, but for now this is it.

I do have access to some pretty stocked gardens though. My Aunt Christine has a backyard full of goodies. There’s all kinds of fruits and vegetables. And fruit trees, glorious fruit trees. She’s got a cheery tree, a couple of plum trees, and an enormous pear tree (some branches spill over into the neighbouring yards so they get to enjoy the fruits too). All this in a pretty small space. I’m pretty sure if she had a couple of chickens her home would be completely self-sustaining.

The plum and pear trees are both giving fruit now, and I’ve got some pretty impressive supplies of both so you’ll be seeing quite a few recipes for those fruits in the next few days.

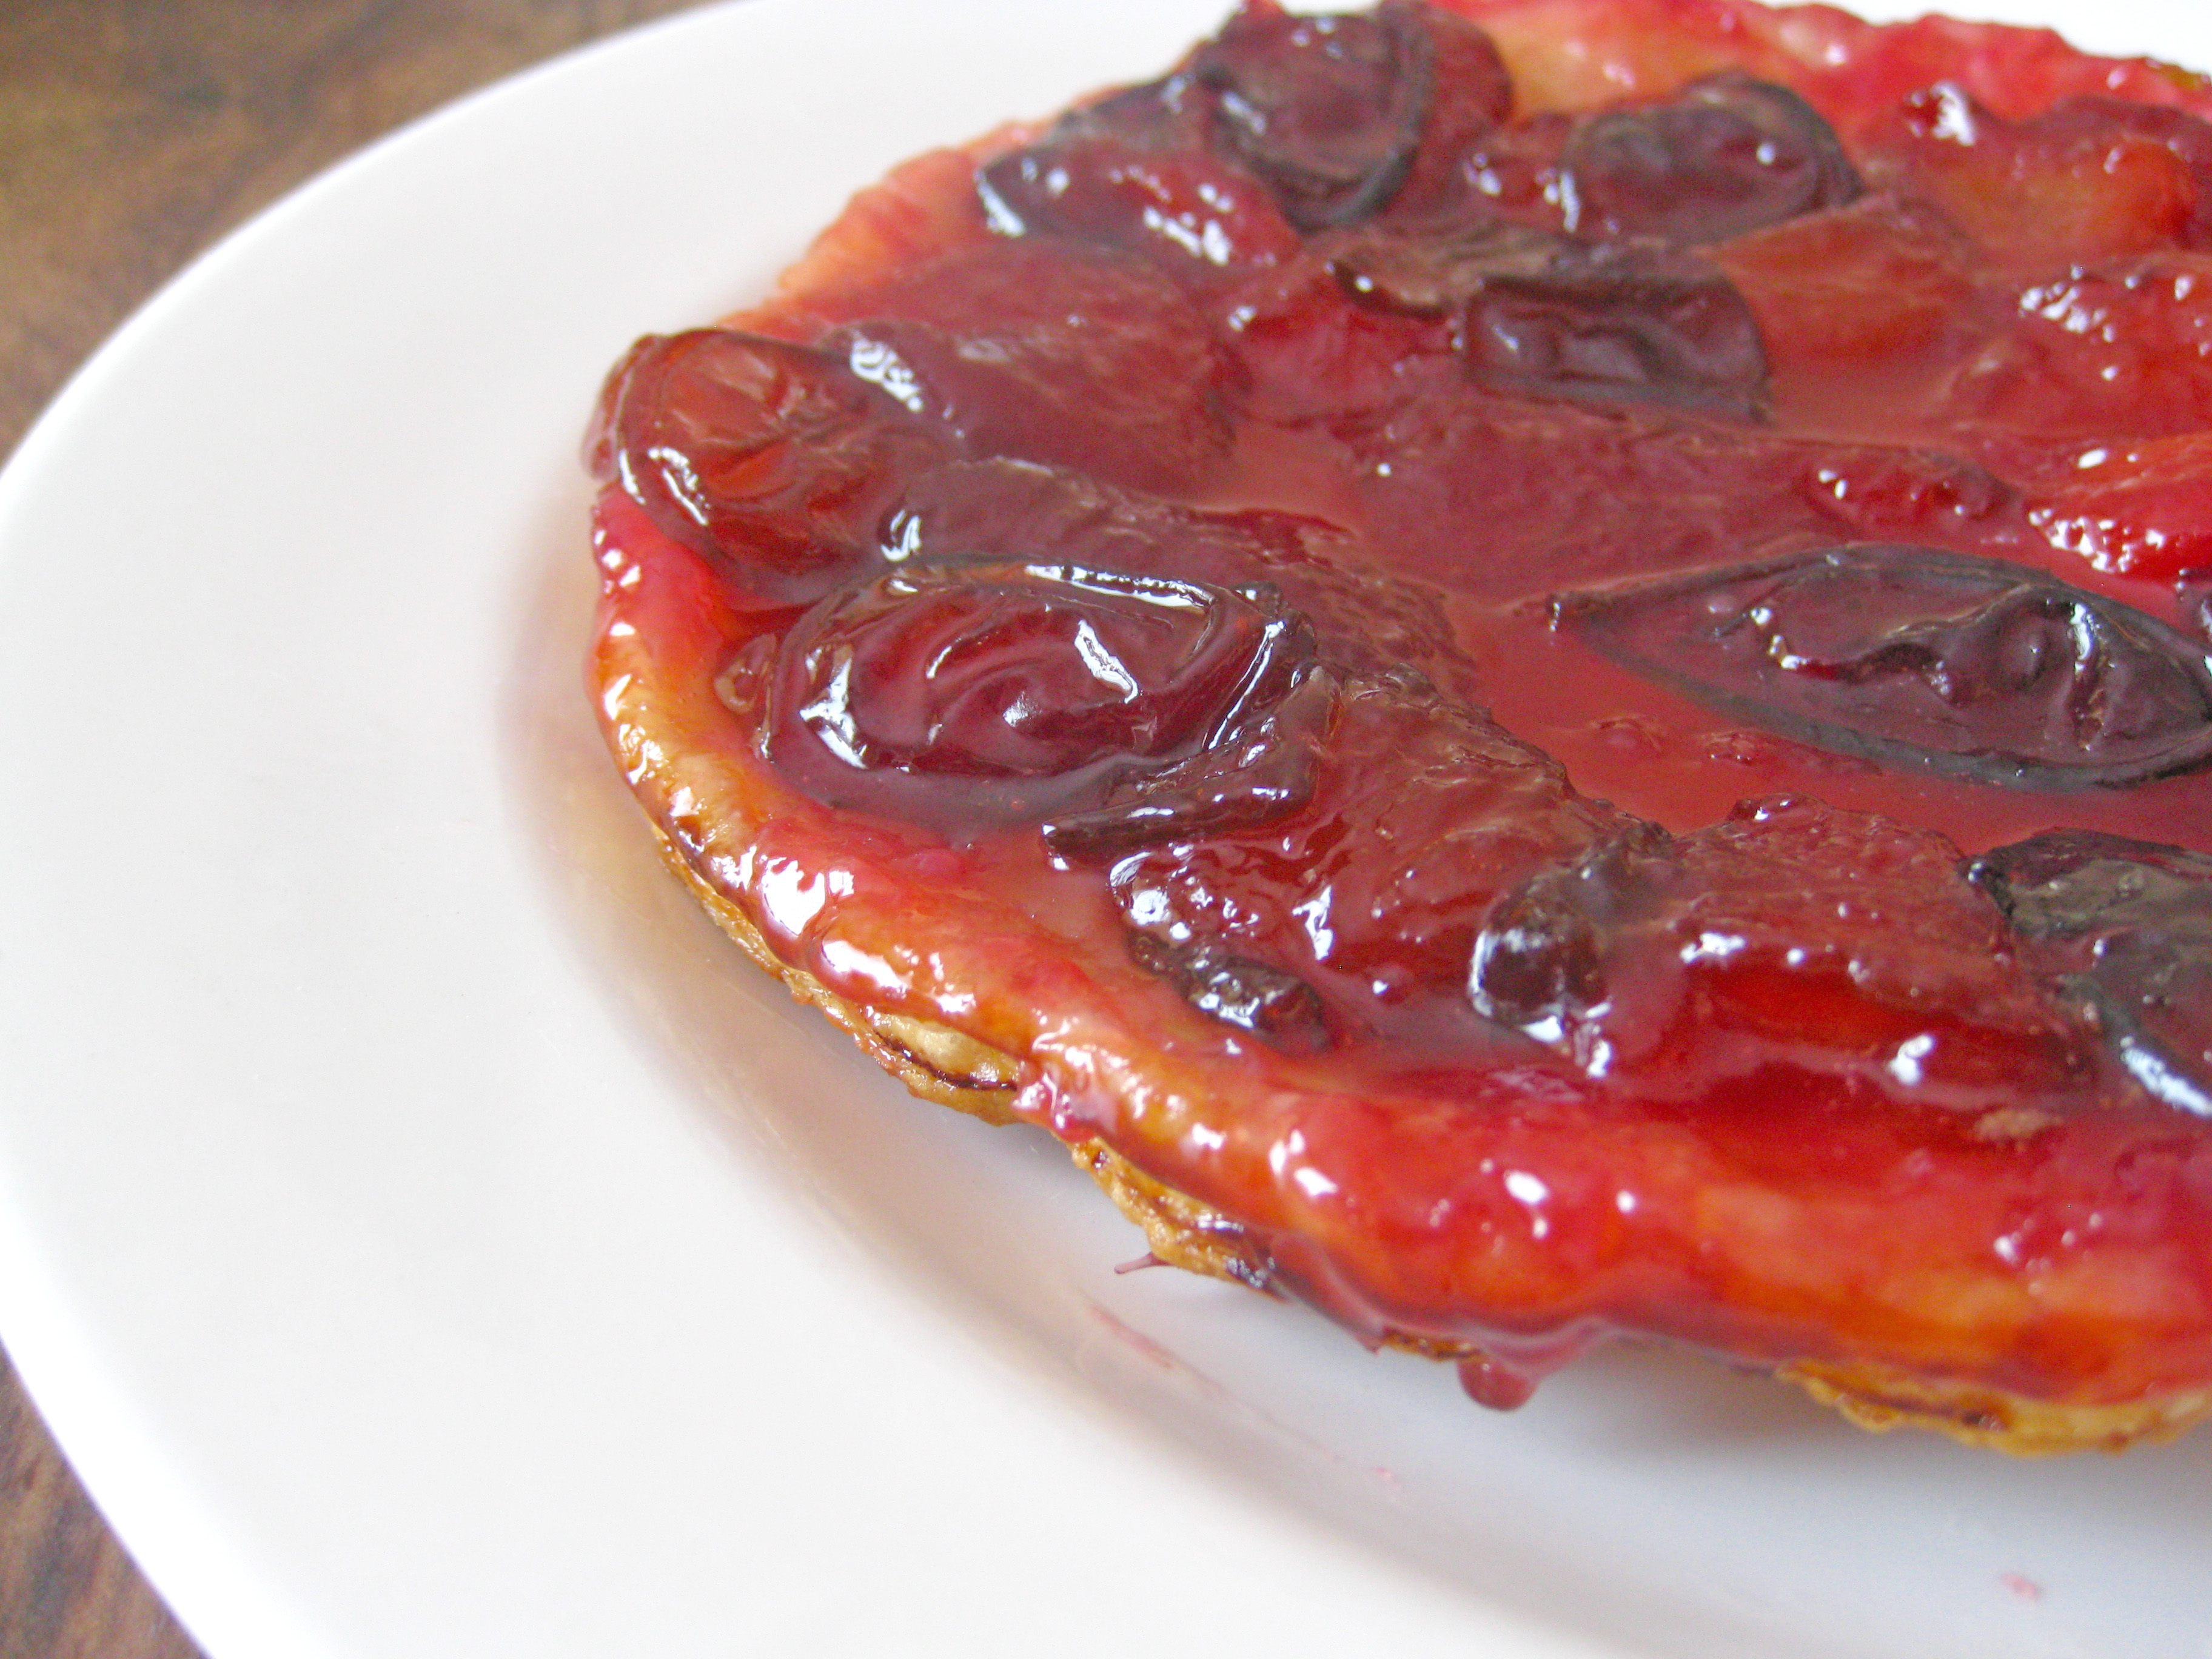
The first is Bon Appetit’s Plum Tarte Tatin. The tart was very easy to make, although I did mess it up a little. The recipe didn’t specify if the plums should be peeled, so I peeled half of them and left the skin on the rest. Because I left the skin on the syrup turn a deep red very quickly. The instructions were to cook until the syrup reached that colour, but I knew it was too soon to stop cooking so I let them go. Turns out I overcooked them so they lost their shape a little. There was also a flipping incident due to my impatience (don’t rush it!)

Despite my mistakes the tarte tatin tasted amazing. The plums tasted almost like jam. The skins I left on gave it a really nice tart (as in mouth puckering) flavour. I definitely will make this again.

Plum Tarte Tatin

  • 2 1/4 pounds sweet firm plums, halved, pitted
  • 2 tablespoons plus 2/3 cup sugar, divided
  • 1 tablespoon fresh lemon juice
  • 1 1/2 teaspoons finely grated lemon peel
  • 1/8 teaspoon ground nutmeg
  • 1/2 vanilla bean, split lengthwise
  • 6 tablespoons (3/4 stick) unsalted butter
  • 1 sheet frozen puff pastry (half of 17.3-ounce package), thawed
  1. Roll out puff pastry. Cut a 9 inch circle, and chill for up to one day.
  2. Peel half of the plums. In a bowl, mix all the plums with 2 tbsp sugar, lemon juice, lemon rind, nutmeg and the seeds from the vanilla bean. Let sit for 30 minutes.
  3. Melt butter in a ovenproof 9 inch skillet over medium heat. Once melted, sprinkle the remaining sugar over the butter.
  4. Place the plums in concentric circles in the butter, cut side up. Pour the juices from the bowl over the plums. Simmer for 20 to 25 minutes. The syrup will have thickened slightly. Let cool for 10 minutes.
  5. Heat oven to 400.
  6. Once the plums have cooled, cover them with the puff pastry.
  7. Bake for about 30 minutes, until pastry is golden. Let cool at least 30 minutes, up to 4 hours.
  8. To flip onto a platter, heat the tarte for 3 minutes in a hot oven to loosen it. Place platter over skillet and flip (make sure you’re wearing an oven mit!) Let stand for 30 minutes.

Enjoy!

Salmon with Coriander Rub and Lime Cream


When it comes to baking, I can usually tell when flavours will work together. Can I use almond extract instead of vanilla? Maybe a little liqueur somewhere. When it comes to savory dishes however, I’m clueless. I love it when magazines or cookbooks tell me what to do, otherwise I’m lost. The June issue of Bon Appetit had a section of starters, mains, and sides that all went together. When I first saw it in June I wanted to make everything, but time passed and I never got around to it. On Saturday while I was thinking of what to make for dinner for my guests I remembered the magazine and started flipping through. Although I still kind of wanted to make everything, I decided on Salmon with Coriander Rub and Lime Cream as a main, with Roasted Potato Salad and Green Beans and Zucchini with Sauce Verte as sides.

The dishes were all great. If anyone still needs a zucchini recipe, this one is delicious. The star of the meal was the salmon though. I’m going to pat myself on the back a little and say that it was perfectly cooked, not too raw, not too flaky. The recipe was also very easy to put together, which is great for entertaining.

The picture above is actually of the leftovers. We just couldn’t wait to dig in so no pictures were taken that night.

Salmon with Coriander Rub and Lime Cream

  • 1 tbsp coriander
  • 1 tsp cumin
  • 6 tablespoons extra-virgin olive oil plus additional for brushing
  • 1 large garlic cloves, pressed
  • 2 3/4 teaspoons finely grated lime peel, divided
  • 6 6-ounce skinless salmon fillets (each about 1 inch thick)
  • 5 tablespoons plain yogurt
  • juice of 1 lime
  • Chopped fresh cilantro
  1. In a baking dish mix together spices, olive oil, garlic and lime zest. Coat salmon fillets with oil and spice mixture. Cover and refrigerate for 1 to 3 hours.
  2. Make lime cream sauce. Mix yogurt, lime juice and cilantro in a small bowl. Season with salt and pepper to taste.
  3. Preheat oven to 425. Remove excess oil from each fillet and place fillets on a baking sheet. Bake for 7 to 10 minutes. Serve with lime cream.

Enjoy!

Magazine Monday Update

In my Healthy Pear Plum Crisp post I mentioned that I would be submitting my recipe to Cream Puffs in Venice for Magazine Mondays. Ivonne is away, however Tina from Life in The Slow Lane At Squirrel Head Manor has graciously hosted this weeks edition. Check out her site to see what everyone has cooked up!

Double Peach Tart

When I moved in to my condo four years ago I knew absolutely nothing about taking care of a home. Things like installing light fixtures, or fixing a leaky faucet were completely foreign to me. Today I know slightly more than nothing, but I’m still pretty much clueless. Thankfully I have friends who are kind enough to help me out with these things. Yesterday, my friends Frank and Bianca came over with their almost two-year old son Sasha. Frank changed the light fixture in the dinning room, I made dinner, and Bianca watched Sasha like a hawk as he ran through my non-babyproofed home.


Frank and Bianca have helped many times over the years, and to thank them I wanted to make sure they had a great meal. Main courses aren’t really my thing, although I think I have been getting better, so I made them an amazing dessert: Double Peach Tart from the September issue of Food and Wine.

The tart tasted amazing. The crust was nice and crisp, it reminded me of a sugar cookie but a little less crumbly. The cinnamon and nutmeg went perfectly with the peaches. I think cardamom would have been nice as well. I made the tart exactly as written by Food and Wine, except for the cooking time. The magazine says to bake for an hour and 40 minutes, however my tart was done after an hour. I’m not sure if the recipe is just wrong or if my oven temperature is off. Either way, I’m really happy I decided to check in on the tart after an hour, it would have been a disaster if I had waited.

Since this is another magazine recipe, I’ll be submitting it to Cream Puffs in Venice for another Magazine Monday entry. Magazine Monday’s are a chance to go through all those magazine recipes we’ve all got bookmarked to make one day. Just post a magazine recipe you’ve made and contact Ivonne and she’ll post it with her next edition.

Double Peach Tart

Crust

  • 1 cup all-purpose flour
  • 1/4 cup confectioners’ sugar
  • Pinch of salt
  • 1 stick unsalted butter, cut into cubes
  • 3 ounces cream cheese, cut into cubes

Filling

  • 10 small, ripe peaches (about 4 pounds)
  • 1/3 cup unsalted butter (5 1/3 tablespoons), softened
  • 3/4 cup granulated sugar, plus more for sprinkling
  • 2 large eggs
  • 1 teaspoon pure vanilla extract
  • 1/4 cup all-purpose flour
  • 1 1/2 teaspoons cornmeal
  • 1/2 teaspoon cinnamon
  • 1/2 teaspoon freshly grated nutmeg
  1. In a large bowl, whisk the flour sugar and salt together.
  2. Add the cubes of butter and cream cheese. Using a pastry cutter or your fingers, work the butter and cheese into the flour until it has a crumbly texture.
  3. Press the dough into a 10 inch fluted tart pan (with removable bottom). Refrigerate for 20 minutes.
  4. Preheat the oven to 325.
  5. Line dough with foil and cover with pie weights or dried beans. Bake for 25 minutes, then remove the weights and foil and bake for 15 more minutes.
  6. While the crust is baking, make the filling. Blanch the peaches in boiling water for 10 seconds each. Peel the peaches, then cut 6 of them into quarters and 4 of them into slices.
  7. Using a mixer, beat butter and sugar until light and fluffy. Add eggs to butter one at a time. Add vanilla.
  8. Add dry ingredients to the butter mixture and continue to mix until well combined.
  9. Pour the filling mixture into the baked tart shell. Place the quartered peaches in concentric circles over the filling. Sprinkle with sugar.
  10. Bake for 1 hour. Check that the filling is golden and firm to the touch.
  11. Cover with sliced peaches before serving.

Enjoy!

Daring Bakers do Beurre Noisette

The August 2010 Daring Bakers’ challenge was hosted by Elissa of 17 and Baking. For the first time, The Daring Bakers partnered with Sugar High Fridays for a co-event and Elissa was the gracious hostess of both. Using the theme of beurre noisette, or browned butter, Elissa chose to challenge Daring Bakers to make a pound cake to be used in either a Baked Alaska or in Ice Cream Petit Fours. The sources for Elissa’s challenge were Gourmet magazine and David Lebovitz’s The Perfect Scoop.


This was my first Daring Bakers Challenge. I signed up at the beginning of July and then anxiously awaited the challenge. When I found out what it was I felt a mixture of both excitement and dread. Excitement because I had never made ice cream before and dread because I don’t own an ice cream maker. I’ve heard horror stories of crunchy ice cream that was impossible to scoop. I considered buying an ice cream maker but storage is an issue in my apartment, so I decided to try the machine free way (this is a challenge after all).

Next up was deciding if I wanted to do both the baked Alaska and the petit fours, or just one. Would I have time to make both? Could I eat both and not gain a million pounds? Once again I decided to go for it; I’m a Daring Baker!

The final decision was what kind of ice cream to make. At first I wanted to do vanilla with cinnamon chips or maybe something fruity. Then I read a post about mango tea ice cream and decided I needed to make tea flavoured ice cream, Earl Grey to be exact. (To the author of that post: I’m so sorry, I really can’t remember who you are but thanks for the inspiration!) When I got to work on the ice cream I realized that doing it without an ice cream maker actually made it pretty easy to make two small batches of different flavours so I made a batch of raspberry along with the Earl Grey. I thought the raspberry would go nicely with the chocolate ganache covering the petit fours, and it turns out it was. Plus the pink stripe looked pretty cute too.

Step one in the process was to make the ice cream. I made the Earl Grey by steeping some tea bags in the milk and sugar mixture. I also added a little Grand Marnier which went really nicely with the citrusy flavour of the tea. For the raspberry I just added some raspberry puree to the vanilla recipe. Making ice cream without an ice cream maker is surprisingly easy, all you have to do is blend the custard every thirty minutes while its freezing. Both flavours turned out very well; easy to scoop and no crunchy bits! It is time-consuming though, so if you don’t have several hours to kill I wouldn’t recommend it.

Once the ice cream was done I moved on the to beurre noisette pound cake. The smell of butter simmering is possibly one of the best smells there is. I really need more brown butter in my life. The pound cake was light and fluffy, not at all what I was expecting, and the butter gave it an amazing flavour. I think the cake was my favourite part of the challenge.

You can find all the recipes for this months challenge at Elissa’s site.

All in all I think this was a very succesful first challenge. I can’t wait for the next!

Healthy Pear Plum Crisp

I love fruit crisps. The warm juicy filling and the crunchy oat topping relax me like no other food can (not even chocolate). They come together so quickly and are pretty much guaranteed to turn out. I really can’t think of anyway I could mess this up.

Yesterday Janice my bother and I painted my kitchen, bathroom and all the hallways. It was a pretty big job but we got it all done in a few hours (thanks again guys!). Today I want to relax and enjoy the new clean white walls. Part of my relaxing day includes a crisp for breakfast using  a Food and Wine recipe from this months magazine. Their recipe calls for nectarines and plums, but the nectarines I have are not quite ripe yet so I swapped them out for pears. The recipe also calls for less sugar than a typical crisp and uses a mix of whole wheat and all-purpose flour to make it a little healthier. It also calls for a butter oil blend instead of just butter, however I just cut back on the butter a little. I left out the orange juice called for only because I don’t have any. I also halved the recipe because I could easily eat an entire crisp in one sitting.

The healthy crisp was definitely just as satisfying as my usual full fat/high sugar version. The ripe fruit provides plenty of sweetness, and there was just enough butter to keep the topping crisp and delicious. The plums also provide a little hit of tartness that is a very nice contrast to the sweet pears. The only thing I might add in the future are some nuts to the crisp topping for a little extra crunch, I think pistachios would be perfect.

Pear and Plum Crisp

Adapted from Food and Wine August 2010

Filling

  • 3 pears, sliced
  • 3 plums, sliced
  • 1/4 cup raisins soaked in hot water for 20 minutes then drained
  • 1/2 cup brown sugar
  • juice and zest of one lemon
  • 1 tbsp whole wheat flour
  • 1/2 tsp cinnamon
  • 1/2 tsp nutmeg

Topping

  • 1/4 cup whole wheat flour
  • 1/3 cup all-purpose flour
  • 1/2 cup brown sugar (not packed)
  • 1/2 cup oats
  • 1/2 tsp cinnamon
  • 3 tbsp cold butter, cut into cubes
  1. Preheat oven to 350.
  2. Make filling; combine all filling ingredients in a large bowl. Toss gently to cover the fruit completely.
  3. Make topping; Put all ingredients in a large bowl. Using your fingers or a pastry cutter, combine butter into the flour until it has a crumbly texture.
  4. Pour filling into a 4 by 4 inch dish. Cover with topping.
  5. Bake for 25 to 30 minutes.

Enjoy!

Since this is one of the many magazine recipes I want to make, I’ll be submitting it to Cream Puffs in Venice for Magazine Mondays.

Like This!

Blueberry Buttermilk Scones

I’ve been trying to cut back on sugar lately (it’s not working but I’m trying). My weakness is baked goods; a biscotti with my latte; a muffin for breakfast; a gigantic piece of mocha ice cream pie drizzled with caramel after drinks…

So I spent some time thinking about what could satisfy my cravings but still keep my blood sugar steady. At first I thought it was hopeless, but then it hit me; scones! I love scones, their slightly crumbly yet somehow buttery texture goes perfectly with a nice cup of tea. The fresh blueberry in these add some moisture.

Blueberry Buttermilk Scones

Yields 12 scones.

  • 1 3/4 cups all purpose flour
  • 1/2 cup whole wheat flour
  • 2 tsp baking powder
  • 1/2 tsp salt
  • 2 tbsp sugar
  • 1/2 cup cold butter, cut into cubes
  • 1 cup buttermilk
  • 1 cup blueberries
  • 1 egg
  1. Whisk together flours, baking powder, salt and sugar.
  2. Add butter. Using your finger tips or a pastry cutter, cut butter into flour mixture until it has a crumbly texture.
  3. Add buttermilk and stir with a fork until the dough just comes together.
  4. Mix in blueberries gently.
  5. Using your hands, make a large ball with the dough, then roll it out until it’s about an inch thick.
  6. Using a round cookie cutter that has been floured, cut the dough into rounds and place on a baking sheet.
  7. Whisk the egg yolk and brush on scones.
  8. Bake in a preheated oven at 425 for 12 to 15 minutes.

Enjoy!

Like This!

Happy Birthday Julia

August 15th was Julia Child’s birthday. Many of us grew up watching her shows, moved by her enthusiasm for food  and the joy teaching people to cook brought her. The Way To Cook is my mothers go to cookbook even now, over 20 years after it was published.  We watched her cooking on her own in Dinner at Julia’s, we saw her marvel at dishes created by others in Cooking with Master Chefs, and we saw her tease and joke with Jacques Pepin in Julia and Jacques Cooking at Home (Jacques is another go to at my parents house).

In honour of her birthday I made a recipe from Baking with Julia ; the tart that made Julia cry. The recipe is actually a Nancy Silverton recipe, and you can watch them make it here. The tart really is wonderful, I can understand how a bite of it could bring tears of joy to Julia’s eyes.

Brioche Custard Tart

  • 1/3 of dough from Golden Brioche
  • 1 cup heavy cream
  • 2 egg yolks
  • 1/2 cup sugar
  • 2 nectarines, sliced
  • 1/2 cup strawberries
  • 2 cups white wine
  • 1/2 cup sugar
  • 5 or 6 basil leaves
  1. After chilling the brioche dough overnight, roll it out to fit in a pie plate, with about an inch of dough overhanging. Fold the overhang into the pie shell to create an edge.  Let rise uncovered for 1 hour.
  2. While the dough is rising, whisk the cream and egg yolks together.
  3. Once the dough has risen, dimple the bottom of the dough (don’t create holes, just dents) and pour the cream mixture in.
  4. Sprinkle the cream with sugar.
  5. Preheat the oven to 300, then bake the tart for 30 to 40 minutes until brioche is cooked and custard has set.
  6. Let cool completely.
  7. While the tart is cooling bring the wine to a boil. Add the sugar and basil leaves. Add the fruit and simmer for a few minutes, just until the fruit is slightly softened. Strain fruit.
  8. Place fruit on tart.

Bon appétit!

Like This!

Golden Brioche

What did I do this weekend? Not much. Watched some TV, napped a little. I would have read something, but I am currently out of books (anyone have any recommendations?) Oh, and I made bread. Brioche, actually. This was my second attempt at making brioche. The first attempt almost lead me to tears of frustration, but Janice’s recent bread success inspired me to try again.

I am so glad I did. This time I used Bon Appétit’s Golden Brioche recipe. I was careful to follow each step exactly as written. I was strangely fascinated watching the butter incorporate into the dough, and at one point could even smell the butter as the mixer worked its magic. Once all the mixing and kneading was done, I waited impatiently for the dough to rise. Then I had the satisfaction of punching it down so it could rise all over. This was followed by the tough part: chilling overnight.

Sunday morning I woke up separated the dough into three equal parts. One part became a loaf, another buns, and the third will get a post all its own soon. I was hoping the loaf would rise a little more, but I am very pleased with the result. It’s wonderful with a little cream cheese and raspberry jam.

Bon Appétit’s instructions are very thorough, so rather than rewriting the recipe in my own words and missing some important step, I’ll just direct you to their recipe. I will say that the rolls were done in about 15 minutes, as the recipe only provides baking times for the loaves.

Enjoy!

Like This!

FaceTweet it!

Zucchini Fritters and Balcony Garden Harvest

I’ve been sick for the last couple of days. I think it’s from walking through all those puddles. Everyone knows germs get in through your feet, that’s why moms insist that their kids wear socks.

When I’m sick I crave comfort foods. One of my favourite comfort foods is french fries, but I wasn’t about to start peeling potatoes in my current state. So I started thinking about what else could satisfy my craving for deep-fried goodness. It hit me as I was looking through the vegetables in my fridge: zucchini fritters.
But I didn’t just want fritters. I wanted something cheesy to dip them in. The only cheese I had was goat cheese. Goat cheese dip sounded pretty good to me. Since I’m sick I decided to throw something healthy into the mix, the first cherry tomatoes from my balcony tomato plant.

The fritters and dip were delicious, but to be honest my favourite part of the meal were the tomatoes. There was something so satisfying about eating fresh tomatoes, bursting with flavour, that I grew myself.

I used Martha Stewart’s Zucchini Fritter recipe, and I based my dip on this recipe from Chatelaine.

Zucchini Fritters

  • 1 medium zucchini, grated
  • 1/2 tsp salt
  • zest of 1 lemon
  • a handful of parsley, chopped
  • chives, chopped
  • 1 egg
  • pepper
  • 1/2 cup flour
  • oil for frying
  1. Combine the zucchini, salt, parsley, chives, egg and pepper in a bowl. Mix well.
  2. Add the flour and mix until there are no lumps of flour.
  3. Heat the oil in a small pan. Using a tablespoon take a small amount and make a ball with the batter.
  4. Fry 4 or 5 of the balls for 2-3 minutes a side until golden brown.
  5. Once cooked place on a paper towel lined plate to drain the oil.

Goat Cheese Dip

  • 140 gram package goat cheese
  • 1/2 cup yogurt
  • 1/2 tsp  coarsely ground black pepper
  • 1/2 tsp salt
  • chives for garnish
  1. Mix all ingredients except for the chives in a small bowl until well combined. If the mixture is too thick and more yogurt.
  2. Top with chopped chives.

Enjoy!

Like This!

FaceTweet it!