Raspberry Curd

Raspberry Curd

It’s been almost a year since my last post.

I think I just needed some space. The food blogging world can become very overwhelming. All of the rules make it very hard to be “successful.”

Post on regular basis

Never post a bad picture

Have the same opinion as everyone else on important issues like the deliciousness of ramps

Promote Promote Promote

It all became too much. This blog was supposed to be fun,  but really it was just wearing me down.

I thought about writing often. I tried to figure what I want this blog to be. What I realized  was that “successful” is what I decide it is. I really enjoy learning about food photography and trying to be better at it. I like baking and sharing the results, but mostly I eat real food, not cake, and I want to share that too.

My blog is not a competition. So I will write what I feel like writing, when I feel like writing. I will post pictures for me, not for foodgawker. Success will be writing a blog that I am proud of. There will be no stress in blogging.

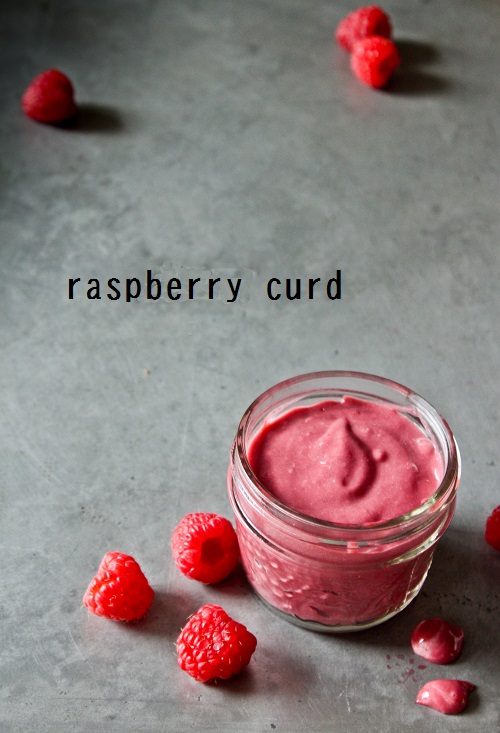
I made the raspberry curd in the photo above for Mother’s Day. Curd plus whipped cream became the filling to a lemon layer cake. The whole thing was topped with a mascarpone/whipped cream icing. Very tasty.

Raspberry Curd

  • 4 cups raspberries
  • 3/4 cups sugar
  • 1/4 cup lemon juice
  • 2 eggs
  • 4 egg yolks
  • 1 tsp vanilla extract
  • pinch of salt
  • 4 tbsp unsalted butter
  1. In a food processor, puree the raspberries. Strain out the seeds in a fine mesh sieve. Mix the strained puree with the sugar and lemon juice in a medium saucepan. Heat one or two minutes.
  2. While the raspberry mixture is heating, whisk the eggs and yolks together. Temper the eggs by adding 1/4 cup of the heated raspberry puree , then pour the eggs into the saucepan. Whisk constantly and heat until the curd reaches 170 degrees F. Strain out any lumps then add the vanilla and salt.
  3. Let cool to room temperature, then beat in the butter using an immersion blender. Cover in plastic wrap and chill for at least 2 hours before serving.

Enjoy!
Eat Write Retreat 2012

I came home from Eat Write Retreat completely exhausted. Three days of eating, learning, mingling can really take a lot out of a girl! I’ve spent the last couple of days reflecting on the weekend and what has struck me the most is the tremendous amount of work Casey and Robyn put into the conference. They, along with some wonderful volunteers, made sure all the conference attendees had a great time. Thank you!

I went to D.C a day early to explore the city. Washington has so much to offer, I barely scratched the surface in one day. It’s a city I will definitely have to go back to.

The conference itself started Friday night with a Cinco de Mayo welcome dinner, and a whole lot of swag. Saturday was packed with activities; food photography and styling followed by lunch at Elizabeth’s Gone Raw, then culinary writing, make money now, and finally dinner at Againn. Sunday was the OXO Kitchen Challenge.. sort of like Chopped but with more prep time. I had to leave after the challenge, but the conference continued with Pitch to the Pros and putting together packages for DC Central Kitchens.

Of the seminars my favourite was Culinary Writing with Monica Bhibe. Monica is a wonderful speaker; her words had me thinking about who I am as a blogger and in life. The real highlight for was meeting some amazing bloggers from around North America, one came all the way from Maui! I met some really kind, engaging people, who all had a story to tell. Once again I’d like to thank Canadian Beef for giving me this amazing opportunity!


Eat Write Retreat Preview

You may recall about a month and a half ago Canadian Beef awarded me a scholarship to Eat Write Retreat. Well the big weekend is finally here! I’ve really been looking forward to this trip. I think the session I’m most looking forward to is Food Styling and Photography with Lisa Cherkasky and Renee Comet… or maybe the coffee tasting.. it’s a tough call.

Before heading off  I figured I’d scope out the list of attendees. There are some pretty impressive bloggers heading to the conference! Here are just a few of the posts that caught my eye. I can’t wait to meet everyone!

Skillet Cookies from The Wicked Noodle

Chocolate Macarons with Nutella Mousse from 52 Kitchen Adventures

Rainbow Salad from Mango Tango

Blood Orange Curd and Buttermilk Scones from Savory Simple

Floor Cake

My kitchen clumsiness apparently knows no bounds. After burning my breakfast this morning I decided to make some that’s unscrewupable, a classic carrot cake with cream cheese frosting. I made the cake, did a pretty good job of slicing it in half, iced it, then placed it on a pretty cake stand. I started to carry it over to my tabletop to photograph when “SPLAT!” the cake slid right off the stand and onto the kitchen floor.

Looking down on the cake the first thing that came to my mind was this episode of Friends, so I thought I’d share some clips of the episode with you. I figure its better to laugh over lost cake than cry, right?

I was able to save the top half of the cake, and I can tell you it’s really good. If you’re interested in making it the recipe is here.

Happy Friday

Happy Friday!

I hope you all had a great week. It’s been very busy for me, and I’m really glad the weekend is almost here. There is a snow storm coming, and I’m ready to cuddle up on the couch and relax.

I don’t have a recipe this week, but I do have  some really exciting news; I am going to Eat Write Retreat thanks to a sponsorship from Canadian Beef!  It’s an amazing opportunity and I am incredibly grateful. I can’t wait!

Panko Crusted Rack of Lamb

What makes you happy? I’ve been thinking a lot about this question lately, mostly in a work context. Turmoil at the office has me thinking about what I want to be when I grow up. Yes, I know that by all reasonable measures I am a grown up, but I’ve always gone with the flow and let circumstances lead me rather than making real choices. Not really grown up behaviour. Circumstances have now led me to a place that makes me very uncomfortable, and I’ve realized need to take control.

When I think about what I want to do I draw a complete blank. The question seems so huge I can’t manage it. So I’m trying to frame the question differently; what makes me happy? The answer to that question tends to be little things.  A Tuesday night with friends and wine.. my yellow rubber boots.. singing at the top of my lungs in the car. And a great meal with family. The kind where everyone is there, my cousins telling the most ridiculous stories, and all of us feeling stuffed beyond belief. A staple at these meals has always been lamb, one of my favourite things to eat. This doesn’t really solve my career issues, but having lamb for dinner Sunday night did make me feel a little better. The little things will always be there, no matter what goes on in the office.

My dad usually handles the lamb, but since I planned on blogging the recipe I decided to make it myself. I did go to him for guidance though, like should it be roasted with the fatty side up or down and how will I know when it’s done? The fatty side should be up, and there’s a pretty neat trick to figuring out if it’s done if you don’t have a meat thermometer. Press the thumb and index finger of your left hand together, now with your right hand poke the fleshy part of your thumb. That amount a give is what you would feel if you poked a piece of lamb that’s cooked rare. Press your thumb to your middle finger, and that amount of give is what you would feel from medium. The next finger over is well done. Or you could just use a thermometer.

Panko Crusted Rack of Lamb

(serves 4)

(Adapted from Laura Calder and Gourmet)

  •  1/2 cups panko
  • 2 cloves garlic, minced
  • 3 tbsp chopped parsley
  • 1 tsp chopped fresh rosemary
  • 1 tsp onion powder
  • 1  tsp salt
  • 1  tsp pepper
  • 3 tbsp olive oil, divided
  • 1 frenched rack of lamb (8 cutlets) at room temperature
  • 4 tbsp Dijon mustard
  1. Preheat the oven to 425 F
  2. Mix the panko, garlic, parsley, rosemary, onion powder,  and half the salt and pepper together. Stir in 2 tbsp olive oil to hold the mixture together. Set aside.
  3. Season the lamb with with the remaining salt and pepper. In a large skillet, heat the remaining tablespoon of oil till it just starts to smoke. Add the meat to the pan, browning on each side for 3 to 4 minutes. Remove the skillet. Cover the lamb with the Dijon, then press the panko mixture onto the mustard. Place the lamb on a rack in a roasting pan. Roast for 20 to 25 minutes for medium rare (130 F on an instant read thermometer). Cover with foil and let the meat rest for 10 minutes before slicing.
Enjoy!

Mixed Berry Pie

Pretty isn’t it?

It tasted good too.

But this pie was a disaster from start to finish. It’s a chocolate pate sucré crust with a mixed berry filling and mascarpone cream topping.

The problems started with the crust.  I planned on making it in a food processor, but for some reason it wouldn`t start. I couldn’t figure it out, everything was locked in properly. This didn’t hold me back though, I just made it by hand instead. I put the dough in the fridge to chill, and a few hours later I rolled out the dough. Or at least I tried to. It was impossible to roll. It kept sticking to the board and breaking into pieces. It quickly became to warm to manage, so I pressed it into the pie plate and let it chill over night.

The next morning I baked the crust and got to work on the filling. I followed the directions for the filling from this recipe, poured it into the crust and let it set for about 5 hours. At that point I was ready to put the mascarpone topping on. I whipped some cream then added some mascarpone to the cream and tried to whip them together. It became a clumpy mess. My mom told me to whip the mascarpone first, then add the whipped cream to the cheese. I asked her if I should start over, she said yes, so I did. Her method worked perfectly, but later she realized I had made two batches. I’m not sure what she thought I meant by start over, but apparently I could have fixed the first batch.

So at this point I put the cream on the pie. But the pie wasn’t even close to set. The weight of the cream caused the pie to overflow. I knew it would not be set in time to eat for dessert. When it came time to cut the pie, I was expecting a goopie mess, but I was not expecting the crust to stick to the pie plate.

It was a disaster.

At least it tasted good.

Because of all my problems, I’m not going to post the recipes but if you’re interested you can check out my inspiration for the pie and the crust recipe I used.

The next day the filling was set and the crust stopped sticking.

Raspberry Cinnamon Muffins: Guest Post on Blog is The New Black

I made these amazing Raspberry Cinnamon Muffins for a guest post on Blog is The New Black. Liz has a great blog, full of awesome recipes and great pictures. If you haven’t seen it, take a couple of minutes to check it out!

Chocolate Cherry Bread Pudding

In my condo I had pretty basic equipment. When I first moved in my budget for appliances was .. well it was low. I bought the cheapest fridge and stove that I could find, and I waited a couple of years before buying a washer and dryer. Even though it was inexpensive, my stove always got the job done. Bread, cakes, roasts; you name it, it was tasty. My only regret was that it wasn’t self cleaning. I didn’t realize how horrible cleaning an oven is until I had to get in there and do it.

Now that I’m back at my parent’s house I have a brand new stove. It’s a lot fancier than what I’m used to. A friend of mine told me that some baked goods don’t work in gas stoves. He didn’t know what wouldn’t work, and I’m not sure I believe it, but I was curious. I decided I’d need to start baking a variety of things to see.

I originally planned a cherry clafoutis, but then I saw this recipe for Vanilla Cherry Bread Pudding. My mind immediately went back to the chocolate babka I made this easter. The first one imploded due to the weight of the chocolate. It failed as a loaf, but it tasted great so I had cut it into chunks and freeze for a bread pudding. Chocolate Cherry Bread Pudding became my first baking experiment in my new oven.

I made a couple of changes to the recipe, the biggest being that I used chocolate babka instead of plain brioche. I also used Amaretto instead of port in the cherry compote. I left out the maple anise ice cream and simply used vanilla ice cream. The results were really, really good. Chocolate and cherry is one of my favourite flavour combinations. The only thing I’d change would be to add more cherry.

I know that most of you don’t have a chocolate babka sitting in the freezer waiting to become bread pudding, so I recommend using brioche and 8 ounces of bittersweet chocolate chopped.

Chocolate Cherry Bread Pudding

  • 45 sweet cherries, pitted
  • 1/2 cup sugar
  • 1/2 cup Amaretto
  • 1 chocolate babka or 1 loaf brioche and 8 oz bittersweet chocolate
  • 3 cups whole milk
  • 2 tsp vanilla
  • 2/3 cup granulated sugar
  • 1/4 teaspoon salt
  • 3 large egg yolks
  • 3 large eggs
  • 1 tablespoon unsalted butter, at room temperature
  1. Make the cherry compote: In a saucepan bring the Amaretto and sugar to a simmer for 5 minutes. Add the cherries and continue to simmer for 5-10 minutes, until the cherries have softened and the liquid has thickened. Pour into a heat proof jar, then place the jar in an ice bath to cool the compote. Set aside.
  2. Make the bread pudding. In a large saucepan, bring the milk and vanilla to a simmer. While the milk is heating, whisk eggs, 2/3 cup sugar and salt together in a large bowl. Once the milk is simmering, pour a small amount into the egg mixture while whisking. Then pour the rest of the milk, whisking constantly.
  3. Grease a 6 by inch baking dish with the butter. Place half of the babka pieces in the baking dish, cover with half the cherry compote, then the remaining babka. Pour the egg/milk over the bread. Let the milk soak for 5 minutes then bake at 350 for 30 to 40 minutes.
  4. Serve with vanilla ice cream topped with the remaining cherry compote.
Enjoy!