Guest Post: Beef Stroganoff

Once again, a very kind blogger has come to my rescue with a great guest post. Sawsan, AKA The Food Doctor, from Chef in Disguise has written a great guest post. Chef in Disguise is full of wonderful recipes from around the world, and most come with stories of family and friendship. It’s a pleasure to read, and I’m so glad Sawsan has taken the time to share this post here!

Beef Stroganoff

The Food Doctor

Beef stroganoff  to me is more than tender strips of beef and mushroom cooked in a cream sauce. It  comes with a set of memories. It is one of the first dishes that “converted” my husband to a mushroom lover (though he still wouldn’t admit it). You see, my husband had a long list of things he wouldn’t even try, mushrooms were on the top of the list followed by okra, eggplant and red beans to name a few.

I personally loved mushrooms and was not ready to omit it from my menu without a fight.

I started making dishes with ingredients my husband loved and sneaking in the mushrooms, it didn’t work at first but slowly and I mean SLOWLY things began to change. Straganoff was actually the first dish (that contains mushrooms) that huzz asked me to make.

You can make this with cooking cream instead of my version with stock and heavy cream but I find mine slightly lighter. I love the addition of oregano, I think it does beautifully with both mushroom and beef. If you have never tried the oregano mushroom before, I urge you to  give it a try but if you have something against oregano please feel free to omit it. It is entirely optional.

I usually serve stroganoff with rice or pasta (fettucini is my favorite) but I know people who love it with noodles, fries or a good slice of bread. It is entirely up to your taste .

Beef stroganoff

250 gm Beef cut into strips

2-3 tablespoons vinegar

Salt

Pepper

1 tablespoon butter

2 tablespoons olive oil

1 can of mushrooms (you can use fresh)

1 onion chopped

1 tablespoons flour

3 cups chicken stock

1 teaspoon mustard

1 tablespoon soya sauce

125 gm heavy cream

1 tablespoon dried oregano

Add the vinegar to the beef, toss to coat and set aside (This will tenderize the meat and add a hint of sourness)

Melt the butter and then add the olive oil to the pan.

Drain the beef strips season with salt and pepper,add them to the pan and stir occasionally for 5 minutes.

Push the meat to one side of the pan, add the onions to the empty space.

Stir the onions occasionally for 2 minutes then add the mushrooms, saute for 5 minutes

Add the flour and stir till it begins to change color to slight golden, add the chicken stock , allow to come to  gentle boil .

Add the mustard, soya sauce  and oregano then lower the heat stirring occasionally.

When the mix starts to thicken,add the heavy cream and stir to combine, cook for 5-7 minutes.

Panna Cotta and Florentine Cookies

The February 2011 Daring Bakers’ challenge was hosted by Mallory from A Sofa in the Kitchen. She chose to challenge everyone to make Panna Cotta from a Giada De Laurentiis recipe and Nestle Florentine Cookies.

This is the first challenge I actually made almost as soon as I read it. Right before putting my place up for sale some friends of mine came over to help me clean out the spare bedroom. They stayed for dinner and I decided to serve them the panna cotta and cookies for dessert. I chose to make Kahlua Panna Cotta with a coffee gelee layer, because I like coffee with my cookies. The panna cotta came together very well, but I had some difficulty with the cookies. With my first batch, I made each cookie too big so it turned into one giant cookie. With the second batch I put fewer cookies on the sheet, but they were still too big. The third batch was the charm. I put about a teaspoon of dough per cookie. I’m not really sure if the cookies were supposed to spread as much as they did, I may have put too much butter in the batter. They tasted really good, but I found them a little greasy.

On the other hand, the Kahlua panna cotta with coffee gelee was perfect. The panna cotta was rich and creamy and the coffee gelee was cool and refreshing. I will definitely make it again.

Kahlua Panna Cotta

  • 1 1/2 tsp gelatin
  • 1/4 cup Kahlua
  • 3 1/2 cups heavy cream
  • 1 cup milk
  • 3 tbsp sugar
  • 1 tsp vanilla
  1. In a stainless steel bowl, sprinkle the gelatin over the Kahlua. Place the bowl over simmering water and stir until the gelatin has completely dissolved.
  2. In a large sauce pan, combine the cream, milk, sugar and vanilla. Bring to a boil for one minute.
  3. Pour the hot cream mixture over the Kahlua and gelatin, stirring until completely combined.
  4. Pour the mixture into greased molds or cups. Chill for 3 hours. Once set, pour the coffee gelee mixture into the molds.

Coffee Gelee

  • 2 cups hot coffee
  • 1/2 cup granulated sugar
  • 1 1/2 teaspoons unflavored gelatin (from one 1/4-oz envelope)
  • 2 teaspoons vanilla
  1. In a sauce pan, bring 1/4 cup water to boil with the sugar. Stir until the sugar is dissolved then remove from heat.
  2. Mix the gelatin with a tablespoon of cold water. Combine the gelatin, sugar syrup, coffee and vanilla together. Let cool completely
  3. Pour over the set panna cotta. Refrigerate for 2 hours.
  4. The panna cottas can be served in the mold, or turned out onto a plate.

Lazy Days and Granola

Winter in Canada can last up to 6 months. In Montreal the first snowfall usually happens in November and the last one in April (sometimes even May). To avoid going completely insane, many of us take up winter sports like skiing or skating. On top of keeping us entertained, winter sports teach us some valuable skills. Most importantly, they teach us how to fall. Basic rule of thumb; sideways is better than backwards.

This week was a tough week for me in terms of falls. Thursday night I was walking home from the bus when I slipped on some ice. My skiing training kicked in, and I managed to fall on my side. The only bruise I suffered was to my ego. Friday was a different story. It was around the same time of night, and the same place, but this time the training did not kick in. My feet went straight out from under me, my tail bone hit the ground first, immediately followed by both my elbows. This fall was bad, the kind that makes you want to cry for your mommy. Unfortunately I’m a grown up and crying for my mommy is no longer socially acceptable, although there was no one around so I guess I could have done it.

Thankfully, I had three days to recover. For Saturday and Sunday, my couch and I were almost inseparable. I had planned on doing nothing the whole time, but by Monday nothing got kind of tiresome, and moving wasn’t that painful. So to pass the time I decided to make granola.

If you are looking for tips on how to make good crunchy granola that actually stays in clumps, this post from Gourmande in the Kitchen is great. Sylvie gives several easy tips in the post, and I added a couple of them to my standard granola recipe. First I used her idea of adding fruit puree to the granola to provide extra moisture, second I used her “clumping technique” to create nice chunks of granola. The granola turned out really well, next time I think I’ll try a few more of her tips.

Granola

  • 2 cups quick oats
  • 1 cup puffed millet
  • 1 tsp salt
  • 1 tsp cardamom
  • 1/3 cup apple sauce
  • 1/4 cup maple syrup
  • 1/3 cup sugar
  • 2 tbsp melted butter
  • 1 cup raw pistachios
  • 3/4  cup pumpkin seeds
  • 1 cup dried cranberries
  1. Preheat oven to 300. Line a baking sheet with parchment or a silicone mat.
  2. In a large bowl, mix the oats, puffed millet, salt, and cardamom together.
  3. In a separate bowl, mix the apple sauce, maple syrup, sugar, and butter together. Add the wet mixture to the oat mixture. Make sure all of the oats are covered.
  4. Spread the granola mixture on to the prepared baking sheet. Clump some of the granola together making sure there is room on the sheet for air to circulate.
  5. Bake for 20 minutes.
  6. Add the nuts and seeds, and stir the granola. Bake for another 25-30 minutes, until the granola is a golden colour.

Enjoy!

Chickpea and Tomato Stew

When I got the March issue of Food and Wine in the mail last week, I realized it had been forever since I did a Magazine Monday post. For those of you have not heard of it, Magazine Mondays are an informal blog event hosted (usually) by Ivonne at Cream Puffs in Venice. The goal is for us to actually make those magazine recipes we have book marked. I’m sure many of us have the same habits. When we get a new cookbook or food magazine we are filled with excitement, but they often end up in a pile or on a shelf, their potential unfulfilled.  Personally, I love to spend weekend afternoons curled up on the couch with a hot cup of coffee flipping through a magazine. I drool over the gorgeous images, enjoy the articles, and fold down all the pages with recipes I want to make. More often than not a magazine will end up with most of its pages folded. Yet somehow when it comes time to find a  new recipe my first stop is always the internet. I think its because I usually have an ingredient in mind before I look for the recipe, and googling “chicken legs” is a lot easier than searching through all my magazines for a good recipe. That’s why I appreciate Magazine Monday so much; it reminds me that food magazines are for more than just drooling over.

This months Food and Wine is full of healthy recipes, which made it even more motivating. As usual there were plenty of them that I wanted to try, but this one really caught my eye. The pictures was gorgeous ( I admit it, I tried to recreate it and failed), and I had all the ingredients on hand. No need to run to the grocery store to make this! It’s a really quick meal to put together, which I’m sure many people will appreciate. The leftovers were also great, so I feel pretty comfortable calling this a good make ahead dish. It’s got a great flavour combination, with ginger and cumin being the dominant flavours. I ate it the stew alone and on a bed of basmitti rice; it’s good both ways, but I preferred it with rice. The original recipe called for a paste to be made with garlic, ginger and jalepenos; as I didn’t have the jalepenos on hand I just omitted them and sauteed the ginger and garlic with the onion rather than making the paste.

Chickpea and Tomato Stew

  • 3 garlic cloves, chopped
  • One 2-inch piece of fresh ginger, grated
  • 1/4 cup vegetable oil
  • 1 onion, diced
  • 2 tablespoons ground cumin
  • 1 tablespoon ground coriander
  • 3/4 teaspoon cayenne pepper
  • 1 can diced tomatoes
  • 2 15-ounce cans chickpeas, drained and rinsed or 3 cups cooked chickpeas
  • 2 cups water
  • Salt and pepper to taste
  • 2 tablespoons cilantro leaves
  1. In a large skillet over high heat, add the oil and onions sauteeing until the onions are sizzling.  Reduce the heat to medium and cook until the onions start to brown.
  2. Add the garlic and ginger and cook until the garlic is fragrant. Add the cumin, coriander, and cayenne; cook for one minute to bring the flavours out of the spices.
  3. Add the tomatoes and water then simmer until thickened.
  4. Add the chickpeas and simmer for another 10 minutes so that the chickpeas take on the flavours on the tomato sauce. Season with salt and pepper.
  5. Serve topped with yogurt and cilantro over a bed of basmitti rice or with naan.

Enjoy!

Tempura and Soba Salad

The February 2011 Daring Cooks’ challenge was hosted by Lisa of Blueberry Girl. She challenged Daring Cooks to make Hiyashi Soba and Tempura. She has various sources for her challenge including japanesefood.about.com, pinkbites.com, and itsybitsyfoodies.com

After missing last months Daring Cooks Challenge I was really excited to get to this one. I joined the Daring Cooks as a way to broaden my cooking horizons and push myself, and tempura is definitely new to me. In fact, I’ve never even tried it before. When I read the recipe I realized it’s basically just deep fried seafood and vegetables. My track record with deep frying is just so so, but I thought I could do this. I followed Lisa’s instructions to make the batter, then started heating the oil. Then the oil started to smoke well before the thermometer said the temperature was right. I started doubting the thermometer. That’s when the smoke detector went off. I turned off the heat, ran to the smoke detector and started waving a towel at it until it stopped. I took the battery out of the smoke detector then went back to work. My mistake in all this was that I didn’t check the temperature of the oil again after the smoke detector went off. I don’t think it was hot enough because both the shrimp and peppers were kind of soggy.

The moral of the story: take the battery out of the smoke detector before I start deep frying.

The second part of the challenge was to make a cold soba noodle salad. This part was less dramatic. I made the spicy dipping sauce to serve on the salad. I was a little disappointed with the sauce, I found it mostly tasted like soy sauce and sesame oil. Both are great flavours, bur I guess I was expecting something a little more complex.

Since I think I kind of failed at this challenge, I’m just going to paste the instructions exactly as written. My tips and changes are only useful if you like soggy deep fried foods.

Soba Noodles:

Ingredients
2 quarts (2 Liters) water + 1 cup cold water, separate
12 oz (340 g) dried soba (buckwheat) noodles (or any Asian thin noodle)

Directions:

Cooking the noodles:

  1. Heat 2 quarts of water to a boil in a large pot over high heat. Add the noodles a small bundle at a time, stirring gently to separate. When the water returns to a full boil, add 1 cup of cold water. Repeat this twice. When the water returns to a full boil, check the noodles for doneness. You want to cook them until they are firm-tender. Do not overcook them.
  2. Drain the noodles in a colander and rinse well under cold running water until the noodles are cool. This not only stops the cooking process, but also removes the starch from the noodles. This is an essential part of soba noodle making. Once the noodles are cool, drain them and cover them with a damp kitchen towel and set them aside allowing them to cool completely.

Spicy Dipping Sauce:

Ingredients
¾ cup 70gm/2½ oz spring onions/green onions/scallions, finely chopped
3 tablespoons (45 ml) soy sauce
2 tablespoons (30 ml) rice vinegar
½ teaspoon (2½ ml) (4 ⅔ gm) (0.16 oz) granulated sugar
¼ teaspoon (1¼ ml) (1/8 gm) (0.005 oz) English mustard powder
1 tablespoon (15 ml) grape-seed oil or vegetable oil
1 tablespoon (15 ml) sesame oil (if you can’t find this just omit from recipe.)
Sea salt and freshly ground black pepper to taste – roughly 1/3 a teaspoon of each

Directions:

1. Shake all the ingredients together in a covered container. Once the salt has dissolved, add and shake in 2 tablespoons of water and season again if needed.

Tempura

Ingredients
1 egg yolk from a large egg
1 cup (240 ml) iced water
½ cup (120 ml) (70 gm) (2½ oz) plain (all purpose) flour, plus extra for dredging
½ cup (120 ml) (70 gm) (2½ oz) cornflour (also called cornstarch)
½ teaspoon (2½ ml) (2½ gm) (0.09 oz) baking powder
oil, for deep frying preferably vegetable
ice water bath, for the tempura batter (a larger bowl than what will be used for the tempura should be used. Fill the large bowl with ice and some water, set aside)

Directions:

  1. Place the iced water into a mixing bowl. Lightly beat the egg yolk and gradually pour into the iced water, stirring (preferably with chopsticks) and blending well. Add flours and baking powder all at once, stroke a few times with chopsticks until the ingredients are loosely combined. The batter should be runny and lumpy. Place the bowl of batter in an ice water bath to keep it cold while you are frying the tempura. The batter as well as the vegetables and seafood have to be very cold. The temperature shock between the hot oil and the cold veggies help create a crispy tempura.
  2. Heat the oil in a large pan or a wok. For vegetables, the oil should be 320°F/160°C; for seafood it should be 340°F/170°C. It is more difficult to maintain a steady temperature and produce consistent tempura if you don’t have a thermometer, but it can be done. You can test the oil by dropping a piece of batter into the hot oil. If it sinks a little bit and then immediately rises to the top, the oil is ready.
  3. Start with the vegetables, such as sweet potatoes, that won’t leave a strong odor in the oil. Dip them in a shallow bowl of flour to lightly coat them and then dip them into the batter. Slide them into the hot oil, deep frying only a couple of pieces at a time so that the temperature of the oil does not drop.
  4. Start with the vegetables, such as sweet potatoes, that won’t leave a strong odor in the oil. Dip them in a shallow bowl of flour to lightly coat them and then dip them into the batter. Slide them into the hot oil, deep frying only a couple of pieces at a time so that the temperature of the oil does not drop.
  5. Place finished tempura pieces on a wire rack so that excess oil can drip off. Continue frying the other items, frequently scooping out any bits of batter to keep the oil clean and prevent the oil (and the remaining tempura) from getting a burned flavor.
  6. Serve immediately for the best flavor, but they can also be eaten cold.

Enjoy!


French Lentils with Feta

I had a bit of a bloggers dilemma while considering writing this post. This is one of my favourite meals, it’s easy to put together, it’s made entirely from pantry items, and it’s delicious. So why would I hesitate?

Well, it ain’t sexy. I stuck a parley sprig garnish on it because while I was taking the pictures all I could think was “man, that’s brown”. Brown food is a tough sell. What does sells in the food blogging world is dessert. If you need proof  have a look at the FoodBuzz Top 9 on any given day; it’s heavily slanted towards sweets, but honestly who can eat that much sugar and maintain any semblance of health?

Don’t get me wrong, I love dessert, but most of what I eat is more along the lines of this meal. Simple, healthy, and still delicious. So I decided to share my boring lentil recipe with you, even though it won’t spike my traffic, because it’s good, and I love it, and you should try it.

French Lentils with Feta

  • 2 tbsp olive oil
  • 1 medium onion, diced
  • 2 cloves garlic, minced
  • 1 cup French Lentils
  • 3 cups vegetable broth
  • 1/2 tsp dried thyme
  • salt and pepper to taste
  • feta, crumbled
  • parsley to garnish
  • brown rice to serve with
  1. In a pot over medium high heat, heat the olive oil. Add the onion and cook until translucent. Add the garlic, cooking until fragrant.
  2. Add the lentils and vegetable broth. Season with salt, pepper and thyme.
  3. Bring to a boil, then lower the heat and simmer the lentils until cooked (about  to minutes)
  4. Serve over brown rice, topped with feta and parsley. Don’t skimp on the feta, it makes the meal.

Enjoy!

Nutella Scones

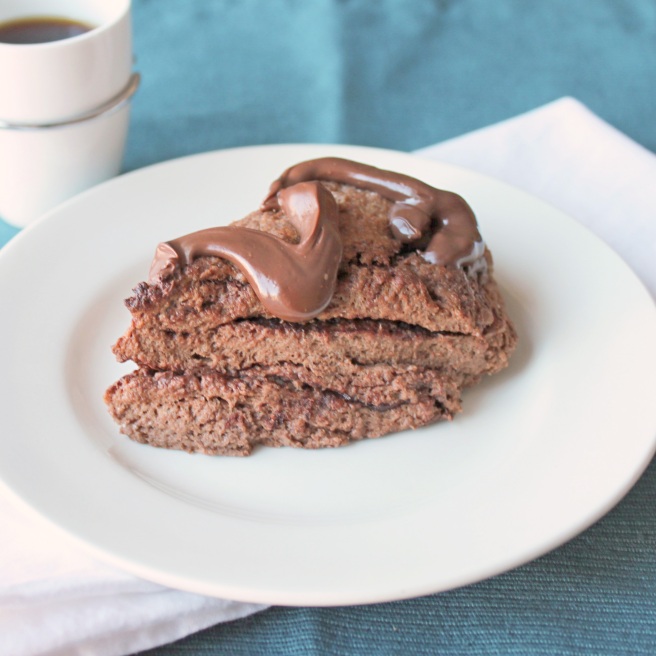
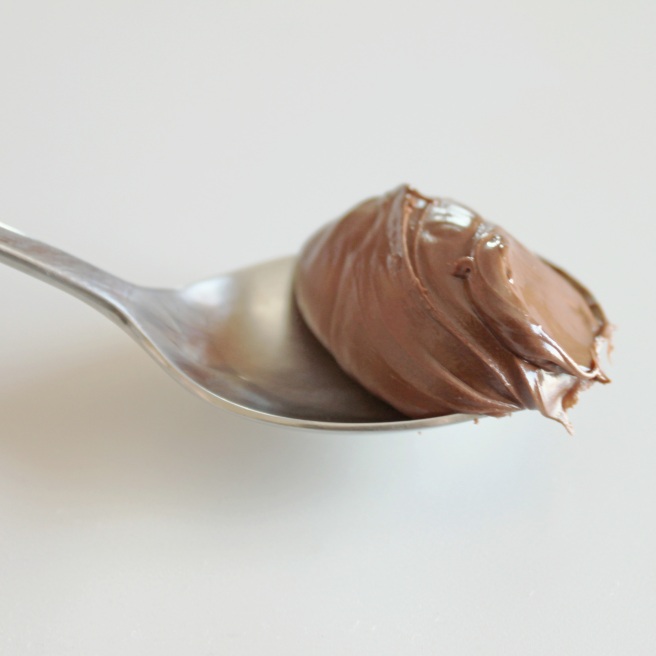
February 5th is World Nutella Day. I may or may not have already mentioned this, but I looooove Nutella. I know it isn’t actually healthy, despite what the commercials say, but it is so delicious. Chocolate and hazelnut are just a match made in heaven.

I think my favourite way to eat Nutella is slathered in a thick layer on toasted white bread. I’ve only started baking with Nutella recently. My first attempt at it was my Chocolate Nutella Bites. That was followed quickly by Abby Dodge’s Nutella Fudge Brownies. To celebrate Nutella Day, I decided to try these Nutella Scones from Baked Explorations. I’ve been eying the book since it came out, and based on how well these guys came out I think I have no choice but to buy it. The scones are incredibly addictive, I love the layers of Nutella baked between chocolate scone. If you don’t have plans for Nutella Day, make these.

Or you could celebrate with a nice big spoonful.

Nutella Scones

  • 2 cups unbleached all-purpose flour
  • 1/4 cup granulated sugar
  • 1/4 cup dark sweetened cocoa powder (like Valrhona)
  • 1 tablespoon baking powder
  • 1/2 teaspoon salt
  • 6 tablespoons (3/4 stick) cold unsalted butter, cut into chunks
  • 1 large egg
  • 1/2 cup heavy cream
  • 3/4 cup toasted hazelnuts,coarsely chopped
  • 1/2 cup Nutella
  1. Preheat oven to 375. Line a baking sheet with parchment or a silicon mat.
  2. In a large bowl, whisk together the flour, cocoa*, sugar, baking powder, and salt. Add the butter* to the flour. Using your fingertips, rub the butter into the flour until the chunks of butter become pea sized and the flour holds together when squeezed.
  3. Whisk the cream and egg together. While mixing, slowly pour the cream mixture into the flour mixture until the dough just comes together. Stir in the hazelnuts*, then pour the dough onto a floured surface. Knead the dough into a 6 inch by 12 inch rectangle (doesn’t have to be exact).
  4. Spread 1/4 cup of the Nutella over the dough, then roll it into a cylinder. Flatten the cylinder into a disk, then slice it into wedges (6 or 8).
  5. Bake for 18 to 20 minutes.
  6. Once baked, place on a cooling rack. Warm the remaining 1/4 cup Nutella, then drizzle it over the cooling scones.

*Notes and tips

The recipe calls for sweetened cocoa, I used unsweetened and found them to be sweet enough.

For scones, cold butter is best. To get it into cubes, cut it while it’s slightly softened then put it in the freezer for a few minutes.

I omitted the hazelnuts because I didn’t have any on hand. They would probably add a really nice crunch, but I didn’t really miss them.

Enjoy!

Simple, Comforting, Delicious: Roast Chicken

It’s amazing how quickly stuff can accumulate. I’ve been in my current condo since 2006. It was my first place so all I had when I moved in were the basics. My budget was pretty tight in the beginning, so I stayed with the basics for awhile. As time went on and I got more comfortable, I started buying some of those “nice to have” things. Then I started buying the “don’t really need by it’s so darn cute” things. Now as I’m decluttering and simplifying for my next move, I’ve realized that I’m bursting at the seams with stuff.

I know most of it is unnecessary, but just putting things in a box is difficult. It’s easy to become attached to stuff. Memories and emotions get all mixed up with possessions. I know that by choosing to sacrifice square footage in order to be in a better location, I’ve also made the choice to simplify. I need to start embracing that.

Simplicity can be a very good thing, like this one pan meal of roast chicken and vegetables. Low on effort and dirty dishes but high in flavour, this is one of my favourite things to make when life gets a little too hectic. Just chop up some root vegetables, toss them with oil and pour them in a pan, put some seasoned chicken on top and roast. I used chicken legs, but if you’re feeding a crowd a whole chicken be used in the exact same way, just use a deeper pan.

Roast Chicken and Root Vegetables

  • Chicken Legs
  • Potatoes, peeled and cut into chunks
  • Carrots, cut into chunks
  • Leeks, cleaned and sliced into large pieces
  • Olive Oil
  • Garlic Powder
  • Paprika
  • Salt and Pepper
  1. Preheat oven to 400
  2. Put the potatoes, carrots and leeks in a pan. Drizzle with some olive oil, then season with garlic powder, salt, and pepper. Toss until the vegetables are evenly coated ( I used my hands)
  3. Season the chicken legs with garlic powder, salt and pepper. Coat with a small amount of oil, then sprinkle with paprika.
  4. Place in the oven and roast for about 40 minutes, until the vegetables are softened and the chicken is cooked through. (Test the chicken by piercing it with a knife and seeing if the juices run clear)

Enjoy!

Roasted White Vegetable Soup

I haven’t been able to find the time to write more than one blog post a week lately, for that I apologize. The biggest reason for this is that I’m about to put my condo up for sale and I’ve been running around taking care of last minute things to get the place showing ready. My real estate gave me a list of things to do, she said there wasn’t that much, yet it seems to be taking all my time. I can’t imagine what having a lot to do would be like.

This weekend I removed all the caulking from my bathtub and redid it. Caulking is not as much fun as it sounds. Removing it is long and tedious work, and applying it is a lot harder than the youtube videos make it seem. Thankfully I had a nice bowl of soup waiting for me when I was done with the silicone-ey mess.

I had seen this recipe on Tartlette a year ago and it stayed in the back of my mind all this time. This weekend’s deep freeze seemed like the perfect setting for it. The soup is thick and creamy, even though there is no cream. Roasting the vegetables gives them a great almost caramelized flavour. It was a wonderfully soothing meal.

I also made the polenta croutons she recommends from Lisa’s Kitchen. I generally don’t like polenta, but a corn flavoured crunch really appealed to me. I followed the recipe and used cayenne, but I think these would also be great with rosemary or thyme. The croutons lost their crunchiness after a day, so if you make them, eat them all fast!

Roasted White Vegetable Soup

  • 1 Cauliflower, cut into florets
  • 1 celery root, peeled and cut into pieces
  • 1 medium onion, peeled and quartered
  • 4 cloves garlic, peeled
  • 2 potatoes, peeled and cut into pieces
  • 2 tbsp olive oil
  • salt, pepper to taste
  • 1 L low sodium vegetable stock
  1. Preheat oven to 400.
  2. Place the vegetables, onion and garlic on a baking sheet. Toss with olive oil, salt and pepper. Roast vegetables for 40 minutes.
  3. Transfer roasted vegetables to a large soup pot. Cover with stock. Bring to a boil then simmer for 20 minutes.
  4. Using an immersion blender puree soup, or allow to cool and pour into a regular blender to puree (may have to be done in batches)
  5. Serve with polenta croutons.

Enjoy!

Double Ginger Chocolate Cookies


Last week I went over to a friends house for coffee. As usually happens when two single women get together, the conversation eventually turned to men. You’d think at this point in our lives we could manage a conversation without talking about them, but no. Long story short, we don’t get them.

You go out on a date (well she does, I think 95% of the population is un-datable), things go really well, and then a week goes by and he hasn’t called for a second date. Why? What happened?

We pondered the possibilities while eating these Double Ginger and Chocolate Cookies. Serious injury was ruled out because she saw him at the gym. He smiled and waved, so it wasn’t amnesia. The men in Montreal tend to be short, and this guy is 6’2”. My theory is he knows all the women in the city are fighting over him and the other four tall guys, so he doesn’t want to commit.

After eating several cookies and drinking too much coffee, we came up with an action plan. Call him, ask how his weekend was, and see if he mentions date number two. She put the plan in place  Sunday night. They had a great conversation, but no second date

At least there were cookies.

I’ll be honest, these were a little too gingery for me. Next time I think I’ll just use the ground ginger. I also think they could use some chocolate chips. The recipe isn’t perfect, but I think with a few more tweaks it could be really good.

Double Ginger Chocolate Cookies

Adapted from the January 2011 issue of Bon Appetit

  • 1 3/4 cups all purpose flour
  • 1/4 cup cocoa powder
  • 2 teaspoons baking soda
  • 1 1/2 teaspoons ground ginger
  • 1 teaspoon ground cinnamon
  • 1/4 tsp salt
  • 3/4 cup sugar
  • 3/4 cup butter
  • 1/4 cup mild-flavored (light) molasses
  • 1 large egg
  • 2 teaspoons minced peeled fresh ginger
  1. Preheat oven to 350
  2. In a bowl, mix together the flour, cocoa, baking  soda, salt, ground ginger, ground cinnamon.
  3. In a separate bowl, cream the butter and sugar together until light and fluffy. Mix in the molasses, egg and fresh ginger until well combined.
  4. Mix the dry ingredients into the wet.
  5. Using a tablespoon or small ice cream scoop, drop dough onto a cookie sheet about two inches apart.
  6. Bake for 13-15 minutes.

Enjoy!