Chocolate Marshmallows

I’m sure many of your diets have switched away from rich holiday meals and desserts to something a little more reasonable for every day life. I’ve been trying to do the same, but my mind keeps wandering back to sugary treats. I think I may have an addiction. I have a hard time going more than a day without something sweet to calm the cravings. It’s hard to believe that not too long ago I cut sugar and gluten completely from my diet.

One of the sweet visions that I go back to regularly are these Chocolate Marshmallows I made in December. There is nothing quite like a homemade marshmallow. Although you can see the resemblance to store bought, looks are really all they have in common. Homemade are much more flavourful, their texture light and fluffy. Unlike store bought, I could eat them as is, no need for anything else.

It was quite the adventure making these, not that the recipe is difficult, I was just having a particularly klutzy weekend. I made a batch and was about to unmold it when somehow I dropped the whole pan on the kitchen floor, sticky side down (of course). There is no 5 second rule when it comes to sticky marshmallow, I had to scoop it up in chunks with my hands, the whole thing ruined.

I still wanted marshmallows, so I made another batch. This time the entire marshmallow making process went off without a hitch.

Unfortunately the photo session didn’t turn out so well. I took a few shots like the one above then started to take photos of the marshmallows in a mug of hot chocolate. It was a gloomy day out, so I had a whiteboard set up to bounce some light onto the mug. I have no idea exactly what happened, but while I was shooting, the white board fell over onto the mug, causing it to topple over and the hot chocolate to spill. There was hot chocolate everywhere; on the table, the carpet, even on my parents upholstered dining room chairs. Disaster. After scrambling to clean it all up I decided there was only one thing to do: sit down and eat marshmallows.

Marshmallows make everything better.

Chocolate Marshmallows

(makes approx 36 marshmallows)

  • 2 tablespoons gelatin
  • 2/3 cup water
  • 3/4 cup sugar
  • 1/2 cup clear corn syrup
  • 4 oz dark chocolate, melted
  • 1/4 cup cocoa powder
  1. Line an 8 by 8 inch pan with plastic wrap and lightly grease the plastic.
  2. In a small sauce pan, sprinkle the gelatin over the water and let the gelatin expand. Add the sugar to the pan and gently heat while stirring until the sugar has dissolved completely.
  3. Pour the sugar and gelatin mixture into the bowl of an electric mixer. Add the corn syrup and then beat for 10 to 12 minutes until the mixture forms stiff peaks. Stir in the chocolate using a spatula to mix.
  4. Pour into the prepared pan spreading with a greased spatula. Refrigerate for about 1 hour until well set.
  5. Cover a work area with half the cocoa powder. Unmold the marshmallow onto the cocoa powder, then cut into squares using scissors or a pizza cutter. Cover each square with the remaining cocoa powder.
  6. Keep in a well sealed container at room temperature for 3-4 days. (if they make it that long)

Enjoy!

Earl Grey Tea Cookies, Take Two

First of all, I’d like to thank everyone who left a comment on my last post. My family has gone through a tough time lately, and although I’d prefer not to get into the details here, the virtual hugs are very much appreciated.

Secondly, I’d like to apologize to all my subscribers and followers for hitting “publish” instead of “preview” earlier today. This was the second time I’ve made that mistake, and I’m hoping I’ll never do it again. I hope having a broken link in your reader wasn’t too much of an annoyance.

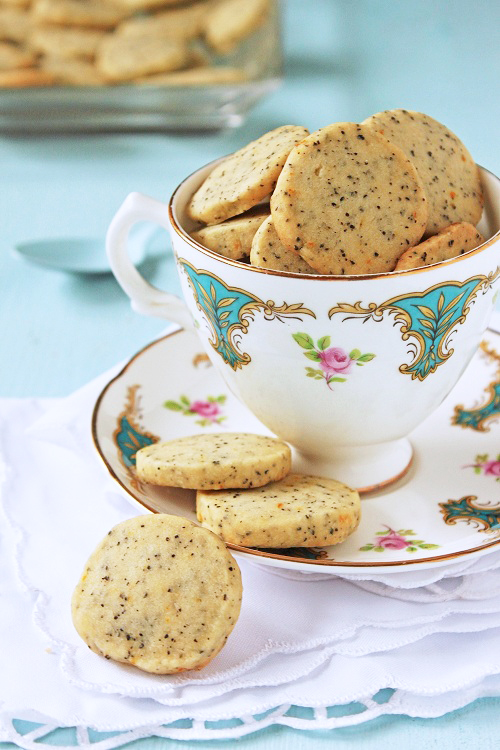
Now onto the cookies. I was heading to a friends for coffee this weekend and didn’t want to show up empty handed. Cookies were the obvious choice; they’re quick, easy, and very transportable. I had a lot ideas about what to make but, as my mom pointed out, few ingredients. I took a look in the pantry and spotted a few containers of Mighty Leaf Tea. Tea in a cookie is something I’ve been meaning to try for awhile. I did a quick Google search and found a Martha Stewart recipe that sounded perfect. Then I had to make a tough decision; should I make the cookies as written, or should I make them with Jasmine Green Tea? In the end I chose to make them as written, but I will definitely be trying them with the green tea as well.

The cookies were perfectly crisp and very lightly flavoured with Earl Grey. Next time I make them I think I’ll omit the orange zest, because although Earl Grey is a citrus based tea, it’s flavour is too light to stand up to the orange. Despite that I really enjoyed these cookies, and I think I’ll be adding them to the Christmas baking rotation. I think they’d make a great gift along with some fancy teas.

Earl Grey Tea Cookies

Makes about 60 cookies

  • 2 cups all purpose flour
  • 2 tbsp finely ground tea (tea can be ground in a spice grinder or mini food processor, use the best quality you can afford as cheaper teas have less flavour)
  • 1/2 tsp salt
  • 1 cup unsalted butter, softened
  • 1/2 cup powdered sugar
  • 1 tbsp finely grated orange zest (optional)
  1. In a small bowl mix the flour, tea and salt together. Set aside.
  2. In a large bowl, beat the butter, powdered sugar and orange zest together with an electric mixer until the butter is light and fluffy (about 3 minutes). Add the flour, mixing until well combined.
  3. Split the dough in half and create two round logs, 1 1/4 inches in diameter, wrap them with parchment paper and refrigerate for 1 hour. To keep the bottoms of the logs from flattening out you can slide the logs into paper towel tubes before refrigerating.
  4. Preheat the oven to 350. Line two cookie sheets with parchment, set aside.
  5. Cut the logs into 1/4 inch slices, place the slices on the baking sheets about 1 inch apart. Bake for 13 to 16 minutes until the bottoms are just golden. Let the cookies cool on a wire rack before serving.

Enjoy!

Apple Cinnamon Cookies with Brown Butter Icing

When tragedy strikes we feel the need to do something, anything, to make it better. Sometimes there are no actions that can be taken. All we can do is be there to comfort each other. The only thing that can make things better is time.

Comfort can come in many forms; kind words, a hug, or even a cookie (or two) with a tall glass of milk. These cookies were adapted from Martha Stewart’s Pumpkin cookies. I substituted unsweetened apple sauce for the pumpkin puree. Since apple sauce is much thinner than pumpkin puree, I strained the sauce with a coffee filter to get a thicker consistency. You could also try cooking the sauce down.

The cookies have a very cake like texture. The apple flavour came through very well, and was wonderfully complemented by the brown butter icing. One note on the icing, make sure to whip it well otherwise the butter will separate.

Apple Cinnamon Cookies with Brown Butter Icing

Makes approx. 48 cookies

  • 2 3/4 cups all purpose flour
  • 1 tsp baking powder
  • 1 tsp baking soda
  • 1 tsp salt
  • 1 1/2 tsp cinnamon
  • 1 1/4 tsp ginger
  • 3/4 tsp nutmeg
  • 3/4 cup unsalted butter, softened
  • 1 1/2 cup packed brown sugar
  • 1/2 cup granulated sugar
  • 2 large eggs
  • 1 1/2 cups unsweetened apple sauce, strained
  • 3/4 cup evaporated milk
  • 1 tsp vanilla extract
  1. Preheat the oven to 375 F. Line two baking sheets with parchment. Set aside.
  2. In a medium bowl, whisk the flour, baking powder, baking soda, salt, and spices together. Set aside.
  3. In a large bowl, beat the butter and sugars together until light and fluffy (about 3 minutes with an electric mixer). Mix in the eggs, followed by the apple sauce, evaporated milk, and vanilla. Add the flour, mixing till well combined. The batter will be quite thin.
  4. Spoon the dough onto the prepared baking sheets, making cookies approximately 1 inch rounds, spaced 1 inch apart.
  5. Bake for 12 to 15 minutes, until the bottoms are lightly browned and the tops spring back when pressed. Let cool completely on a wire rack before icing.

Brown Butter Icing

  • 4 cups powdered sugar, sifted
  • 10 tbsp unsalted butter
  • 1/4 cup evaporated milk
  • 2 tsp vanilla
  1. Put the powdered sugar in a mixing bowl, set aside.
  2. In a medium saucepan melt the butter over medium heat. Cook, stirring occasionally until the butter becomes golden brown and smells nutty. Pour the melted butter over the powdered sugar, making sure to scrape the brown butter bits in as well. Add the evaporated milk and vanilla. Beat with an electric mixer until smooth. Use to ice cooled cookies.

Enjoy!