Mini Banana Loaves

O & G Banana Bread

I wasn’t planning on posting these mini loaves. I made them on a whim last weekend, thinking they’d make a good snack to take to work. It turns out this is the greatest banana bread ever. Seriously.

I used the Olive & Gourmando recipe from The Art of Living According to Joe Beef. I’ve had the book since Christmas and have been eyeing this recipe ever since. I hesitated to make it because it seemed a little too involved for banana bread. I mean, it’s supposed to be a “quick” bread, right?  Turns out the extra steps were totally worth it. Unlike a typical banana bread, where baking powder is added to dry ingredients, this recipe calls for adding baking soda to sour cream before mixing it into the batter. On top of this unusual step, the recipe also called for microwaving the bananas to extract the juices and then reduce the juice by half. I don’t have a microwave so I heated the bananas over a double boiler, which worked very well.

The flavour was rich, the texture light and moist at the same time. Even days later these mini loaves tasted incredible. So I snapped a quick to prove to you that although this banana bread must be tried.

O & G’s Banana Bread

  • 1/2 cup sour cream (room temperature)
  • 1 1/2 tsp baking soda
  • 4 ripe bananas
  • 1/2 cup unsalted  butter (room temperature)
  • 1 cup packed dark brown sugar
  • 2 eggs (room temperature)
  • 2 tsp vanilla extract
  • 1 1/2 cup all purpose flour
  • 1 tsp cardamom
  • 1 tsp cinnamon
  • 1/2 tsp nutmeg
  • 1/2 tsp salt
  1. Preheat the oven to 350 F. Grease  8 mini loaf molds, set aside.
  2. Mix the sour cream and the baking soda together, set aside. 
  3. Over a double boiler, gently heat the banana for 5 minutes. Place the bananas in a fine mesh sieve and strain out the juices, you should get 1/4 to 1/2 cup of juice. In a small sauce pan  over medium reduce the juice by half, then return the juice to the banana and mash the bananas (don’t puree). 
  4. In a large bowl beat the butter and sugar together with an electric mixer. Add the eggs one at a time, then add the vanilla. Stir in the bananas with a spatula, then the sour cream mixture. 
  5. In a separate bowl, mix the flour, spices and salt together. Fold the flour into the banana/butter mixture. 
  6. Pour the batter into the prepared loaf molds. Bake for 30 minutes, until a tester comes out clean. Let cool in the molds for 15 minutes, then turn out onto a rack to cool completely. 
Enjoy! 

Strawberry Lime Ice Pops

I know many of you have moved on to other summer fruits, but I’m still stuck on strawberries. I was away for a week and felt that I needed to eat an extra weeks worth in order to “catch up”. I went out and bought a ton of Quebec strawberries all at once. Unfortunately, eating them all before they went bad turned out to be impossible. That’s ok though, I was planning on preserving some anyway.
Every year I make a few bottles of strawberry jam. Although I like to dream of giving up my job and selling jam, anyone who has seen that episode of Friends where Monica attempts this knows that’s it’s almost impossible to make a living selling jam. My reasons for making it are more ethereal; in the dead of winter, when the ice and cold have me feeling like I couldn’t possibly go on, the smell of homemade strawberry jam revitalizes me. It’s like sunshine in jar.

popsicles

I still had a few strawberries left after making my jam, so I decided to have a little fun with them. We were kids, Mom would often make strawberry juice. It’s just strawberries pureed with sugar, but the taste is incredibly fresh and rich. Sometimes we’d freeze the strawberry juice and save it for the winter too. It’s a lot of work, but once you scrape up a bowl full you get the fresh summer flavour in the middle of winter. But on this day I didn’t feel like waiting for my frozen treat, so I decided to make myself some ice pops. I added a little lime juice to give them a little extra kick. They’re perfectly refreshing on a hot summers day.

Strawberry Lime Ice Pops

  • 4 cups strawberries, hulled and cleaned
  • 1/2 cup sugar
  • juice of 1 lime
  1. Place all ingredients into a blender. Puree until smooth. Pour the mixture into ice pop molds and freeze completely. 
Enjoy! 

Strawberry Rhubarb Crumb Pie

I have a confession to make. Although I am well known as a lover of all things pie, up until this May I had never actually tasted a Strawberry Rhubarb Pie. Shocking, I know.
My first taste of this classic was at the Old Ebbit Grill in Washington. They had a selection of desserts featuring local strawberries that could not be resisted.

After one bite I knew I had found a new love. The tart rhubarb and sweet strawberries combined to make a perfect almost jam like filling. I wanted more. So as soon as the first local strawberries appeared, I went out and bought a basket. I paid top dollar for these berries ($7 for a litre) but it was totally worth it.

Using Anna Olson’s recipe, I baked my first Strawberry Rhubarb Pie. The crust was crisp and flaky on the edges, but the base got a little soggy. Next time I think I’ll blind bake the crust for a few minutes before adding the filling. The filling was delicious, sweet and tart, just like the slice I had in Washington. Be sure the pie is completely cooled before slicing to ensure that the filling has set.

Strawberry Rhubarb Pie
Adapted slightly from here.

Crust

  • 1 1/4 cup all purpose flour
  • 1/4 tsp salt
  • 1/4 cup cold butter, grated
  • 1/4 cup cold shortening, grated
  • 1 tbsp lime juice
  • 3 to 5 tbsp ice cold water

Filling

  • 4 cups rhubarb, chopped
  • 2 cups strawberries, sliced
  • 1 cup sugar
  • 3 tbsp cornstarch
  • 1/2 tsp cardamom
  • 1/4 tsp ginger
  • pinch of salt

Crumble Topping

  • 1/4 cup unsalted butter
  • 2/3 cup all purpose flour
  • 1/2 cup sugar
  • 1/4 tsp cardamom
  • pinch of salt
  1. Make the pie crust. In a large bowl mix the flour and salt together. Using a pastry cutter or your finger tips, cut the butter and shortening into the flour until pea sized pieces of butter and shortening are formed. Add the lime juice and 3 tablespoons of ice water. Stir with a fork until the dough comes together, adding more ice water if necessary. Form the dough into a disk, cover with plastic wrap and refrigerate for 30 minutes. Once chilled, roll out the dough till 1/4 inch thick and large enough to fill a 9 inch pie plate. Place the dough in the pie plate, trim the edges and chill for another 30 minutes. 
  2. Make the filling. While the dough is chilling, mix all the filling ingredients together in a large bowl. Let sit for 30 minutes then pour into to prepared pie crust. 
  3. Make the crumb topping. In a small saucepan, brown the butter. In a small bowl mix the flour, sugar, cardamom and salt together. Pour the browned butter over the flour mixture and stir together. Pour the crumb topping over the pie filling. 
  4. Bake the pie at 400F for 20 minutes, then lower the temperature to 350F and continue baking for another 40 minutes, until the bubbles. The pie may leak, so place a baking sheet underneath the pie plate to avoid a messy oven. 
  5. Let the pie chill completely before serving (at least 3 hours)
Enjoy!

Chocolate Pear Tart

crab apple blossoms

For a few days every Spring, the crab apple tree in my parents backyard blooms with the prettiest pink flowers. After a day or two, petals start showering down until there is just one little flower left. The backyard is like a little sanctuary; surrounded by trees on all one could almost think they were in the country. Almost. I like to sit out there on the weekends with a nice cup of coffee and just enjoy the weekend, it helps take the stress of the week away.

My doctor recently told me to try not to stress. Easier said than done. He also told me to cut back on caffeine. He then went on to list things that have caffeine in them; coffee, tea, soda, chocolate…

Chocolate?

I know that chocolate has caffeine in it, but the idea of taking chocolate out of my life as a way to reduce stress just seems like madness to me. So I have decided to selectively follow his advice. I don’t eat that much chocolate, but I’m not prepared to give up what I do have.

This tart wasn’t made to intentional defy the doctors orders, but he may have put the idea of chocolate into my head. I was flipping through Martha Stewart’s New Pies and Tarts, when I came across this recipe. I had all the ingredients and it looked really easy and quick to put together so I figured I’d give it a try. I was right, it was really easy to put together, but I’m not sure it could be made without a food processor. A few drops did drip out of the tart pan, so if you decide to make this placing a baking sheet on the rack below that tart.

Basically a flourless chocolate cake with pears, this tart is intensely chocolatey. The pear and chocolate were a really nice combination, and the almond rounded all the flavours out. I did find it a little too moist, I think some of the juice from the pear seeped into the tart.

Chocolate Pear Tart

Adapted very slightly from Martha Stewart

  • 1/2 cup unsalted butter at room temperature
  • 1 cup slivered almonds
  • 3/4 cups granulated sugar
  • 3 large eggs
  • 1/3 cup cocoa powder
  • 1/2 tsp salt
  • 1 tbsp almond liqueur
  • 3 firm, ripe pears
  • 2 tbsp apricot or apple jelly
  1. Preheat the oven to 350F. Grease a 9 inch tart pan, set aside.
  2. In a food processor, combine the almonds and sugar until finely ground. Add the butter, eggs, cocoa, vanilla and almond liqueur. Process until well combined. Pour into the prepared tart pan. 
  3. Peel, core and slice the pears and place them on the tart. Bake for 45 to 50 minutes, until a tester comes out clean. Heat the jelly slightly then brush on the pears. Let the tart set for 20 minutes before removing from the pan. 
Enjoy!

Eat Write Retreat 2012

I came home from Eat Write Retreat completely exhausted. Three days of eating, learning, mingling can really take a lot out of a girl! I’ve spent the last couple of days reflecting on the weekend and what has struck me the most is the tremendous amount of work Casey and Robyn put into the conference. They, along with some wonderful volunteers, made sure all the conference attendees had a great time. Thank you!

I went to D.C a day early to explore the city. Washington has so much to offer, I barely scratched the surface in one day. It’s a city I will definitely have to go back to.

The conference itself started Friday night with a Cinco de Mayo welcome dinner, and a whole lot of swag. Saturday was packed with activities; food photography and styling followed by lunch at Elizabeth’s Gone Raw, then culinary writing, make money now, and finally dinner at Againn. Sunday was the OXO Kitchen Challenge.. sort of like Chopped but with more prep time. I had to leave after the challenge, but the conference continued with Pitch to the Pros and putting together packages for DC Central Kitchens.

Of the seminars my favourite was Culinary Writing with Monica Bhibe. Monica is a wonderful speaker; her words had me thinking about who I am as a blogger and in life. The real highlight for was meeting some amazing bloggers from around North America, one came all the way from Maui! I met some really kind, engaging people, who all had a story to tell. Once again I’d like to thank Canadian Beef for giving me this amazing opportunity!


Eat Write Retreat Preview

You may recall about a month and a half ago Canadian Beef awarded me a scholarship to Eat Write Retreat. Well the big weekend is finally here! I’ve really been looking forward to this trip. I think the session I’m most looking forward to is Food Styling and Photography with Lisa Cherkasky and Renee Comet… or maybe the coffee tasting.. it’s a tough call.

Before heading off  I figured I’d scope out the list of attendees. There are some pretty impressive bloggers heading to the conference! Here are just a few of the posts that caught my eye. I can’t wait to meet everyone!

Skillet Cookies from The Wicked Noodle

Chocolate Macarons with Nutella Mousse from 52 Kitchen Adventures

Rainbow Salad from Mango Tango

Blood Orange Curd and Buttermilk Scones from Savory Simple

Chocolate Marzipan Cake

Cake

In exactly seven months I will be living in my brand new condo. I went down to the construction site last week, the building is far from done but it is definitely a building. I’m getting pretty excited thinking about living there. I’ve been scoping out deals on line for all the things I need. I think I’ve got my couch and bed picked out, and I’m now moving on the colour schemes. What do you think of white, grey, and yellow?

I’m also getting really nervous. A downtown condo on my own is a huge deal financially. I’ve gone over the budget a million times, and even though I know I can do it I still worry. I’m good at worrying. I sometimes find myself stuck in a loop of “what ifs”. My latest solution is to give myself a firm action plan and then listen to Bob Marley. Every little thing is gonna be alright.

flowers

Of course the classic stress reliever is chocolate. This cake will calm me down even on my most anxious days. Thanks to the marzipan it’s dense and moist, and the almond flavour perfectly complements the chocolate. This recipe is also really easy to make, just be sure your ingredients are at room temperature so that the eggs and butter combine properly.

cake

Chocolate Marzipan Cake

Adapted from Anna Olson

  • 1 cup unsalted butter, room temperature
  • 1/2 cup sugar
  • 250 g marzipan
  • 6 eggs, room temperature
  • 1 tsp vanilla extract
  • 1/2 tsp almond extract
  • 1/2 cup all purpose flour
  • 1/2 cup cocoa powder
  • 3/4 tsp baking powder
  • 1/2 tsp salt
  • 1 cup whipping cream
  • 1/4 cup icing sugar
  • berries to garnish
  1. Preheat the oven to 350 F. Grease and flour a 10 inch springform pan, set aside.
  2. In a large bowl, beat the butter and sugar together until light and fluffy with an electric mixer. Break the marzipan into pieces and mix into the butter mixture until smooth.  Beat in the eggs one at a time, making sure they are well combined after each addition. Mix in the vanilla and almond extracts. 
  3. Sift the flour, cocoa, baking powder and salt. Beat into the butter mixture until well combined. 
  4. Pour the cake batter into the prepared pan. Bake for 35 to 45 minutes until a tester comes out clean. Let the cake cool in the pan for 20 minutes then turn it out onto a rack to cool completely.
  5. Whip the cream with the icing sugar until stiff, cover the cooled cake with cream. Garnish with berries. 
Enjoy!

Floor Cake

My kitchen clumsiness apparently knows no bounds. After burning my breakfast this morning I decided to make some that’s unscrewupable, a classic carrot cake with cream cheese frosting. I made the cake, did a pretty good job of slicing it in half, iced it, then placed it on a pretty cake stand. I started to carry it over to my tabletop to photograph when “SPLAT!” the cake slid right off the stand and onto the kitchen floor.

Looking down on the cake the first thing that came to my mind was this episode of Friends, so I thought I’d share some clips of the episode with you. I figure its better to laugh over lost cake than cry, right?

I was able to save the top half of the cake, and I can tell you it’s really good. If you’re interested in making it the recipe is here.

Berry Mascarpone Almond Tart

Berry Mascarpone Tart

I’ll Have What She’s Having turns two years old this week. To be honest, I never really thought I would still be blogging at this point. I’m one of those people who moves from obsession to obsession, leaving past ones behind without much thought or regret. I think what keeps food blogging interesting for me is that it continually challenges me to learn new things. In these two years I’ve learned more about photography than I ever would have without this blog, and there is still so much to learn.
In the coming year I want to challenge myself to expand my culinary skills as well as my photography skills. I want to try new cooking techniques, attempt dishes that are “scary” (chocolate soufflé, I’m looking at you), and experiment with flavours that I normally wouldn’t use. A friend of mine recently told me that she enjoys my “style” of desserts because I tend to make things she wouldn’t normally make. I want to take that even further.

Berry Mascarpone Tart

The biggest thing that keeps me going is the responses I get from readers. Your comments encourage me, inspire me, and push me to make What She’s Having better and better. Thank you.
On the topic of comments, WordPress recently made some changes to their commenting platform. Those of you who try to comment using an email address that is linked to a WordPress or Gravatar account will have to log into your accounts before leaving a comment. This change was in response to some cases of Gravatars being hijacked for trolling. Although I understand that something needed to be done, the response was kind of like using a sledgehammer to fix a splinter. I’ve removed the requirement to leave an email address when commenting so that those of you who do not want to log don’t have to. I’m keeping my fingers crossed that I won’t end up with too much spam.

Berry Mascarpone Tart

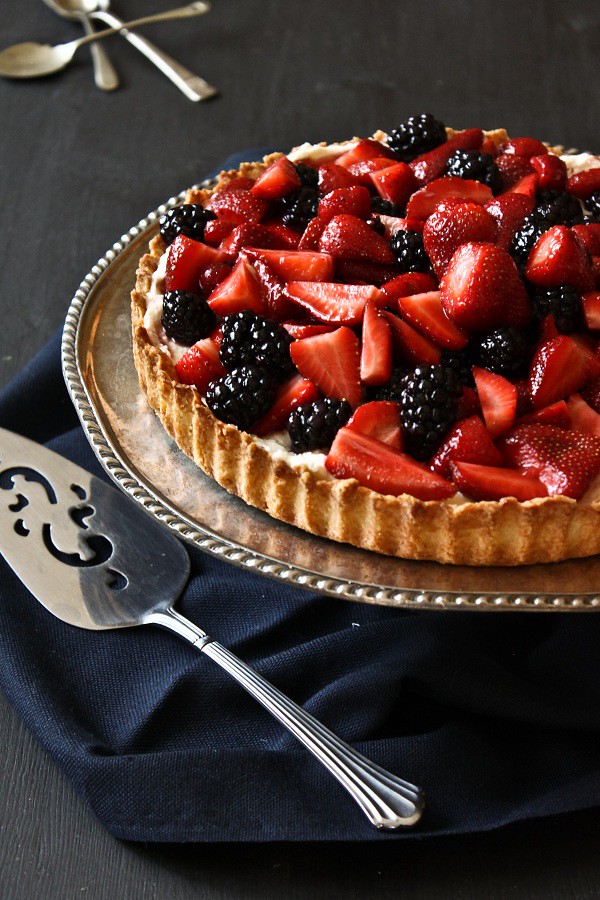
To celebrate my blogaversary, I made this Berry Mascarpone Almond Tart. It’s similar to this one I made last summer except that this time the recipe came together without any drama. The crust has a nice crunch to it from the almonds, and it’s easy to cut through. The filling is similar to a no bake cheesecake filling, creamy and rich. The amaretto flavours works really well with the berries.

Berry Mascarpone Almond Tart
Adapted from Desserts for Breakfast

Pastry Crust

  • 1 cup all-purpose flour
  • ¼ cup almond flour
  • ½ tsp. salt
  • ½ cup unsalted butter, chilled and cut into cubes
  • 1 egg yolk
  • 2-4 tbsp. ice water

Mascarpone Filling

  • 400 grams mascarpone at room temperature
  • 2 tbsp. icing sugar
  • 2 tbsp. amaretto
  • ½ cup whipping cream

Berry Topping

  • 2 cups mixed berries, cleaned
  • 2 tbsp. seedless raspberry jam

1.  Make the pastry crust: In a large bowl mix the flour, almond flour and salt together. Add the butter. Using your finger tips or a pastry cutter, rub the butter into the flour until it forms pea sized pieces of butter and holds together when squeezed. Mix in the egg yolk, and just enough water to bring the dough together. Form the dough into a disk, cover in plastic wrap, and refrigerate for at least 2 hours. Once chilled, roll out the dough to ¼ inch thick and place in a 9 inch tart pan; dock the crust (poke holes with a fork). Refrigerate the crust for 1 hour. Preheat the oven to 400F. Place a sheet of parchment paper on the crust and cover with pie weights or dried beans. Bake for 13-15 minutes, remove the pie weights and parchment and bake for an additional 3-5 minutes. Let cool completely.
2.  Make the filling: In a medium bowl, beat the mascarpone and a tablespoon of the cream together using a hand held mixer until the mascarpone is softened. Beat in the sugar and amaretto. In a separate bowl whip the cream. Fold the whipped cream into the mascarpone. Pour into the chilled tart crust.
3.  Make the berry topping: In a microwave safe bowl heat the jelly until it liquefies (about 30 seconds). Toss the berries with the jelly. Pour over the mascarpone filling. Chill the tart for at least 1 hour before serving.
Enjoy!