Strawberry Lime Ice Pops

I know many of you have moved on to other summer fruits, but I’m still stuck on strawberries. I was away for a week and felt that I needed to eat an extra weeks worth in order to “catch up”. I went out and bought a ton of Quebec strawberries all at once. Unfortunately, eating them all before they went bad turned out to be impossible. That’s ok though, I was planning on preserving some anyway.
Every year I make a few bottles of strawberry jam. Although I like to dream of giving up my job and selling jam, anyone who has seen that episode of Friends where Monica attempts this knows that’s it’s almost impossible to make a living selling jam. My reasons for making it are more ethereal; in the dead of winter, when the ice and cold have me feeling like I couldn’t possibly go on, the smell of homemade strawberry jam revitalizes me. It’s like sunshine in jar.

popsicles

I still had a few strawberries left after making my jam, so I decided to have a little fun with them. We were kids, Mom would often make strawberry juice. It’s just strawberries pureed with sugar, but the taste is incredibly fresh and rich. Sometimes we’d freeze the strawberry juice and save it for the winter too. It’s a lot of work, but once you scrape up a bowl full you get the fresh summer flavour in the middle of winter. But on this day I didn’t feel like waiting for my frozen treat, so I decided to make myself some ice pops. I added a little lime juice to give them a little extra kick. They’re perfectly refreshing on a hot summers day.

Strawberry Lime Ice Pops

  • 4 cups strawberries, hulled and cleaned
  • 1/2 cup sugar
  • juice of 1 lime
  1. Place all ingredients into a blender. Puree until smooth. Pour the mixture into ice pop molds and freeze completely. 
Enjoy! 

Strawberry Rhubarb Crumb Pie

I have a confession to make. Although I am well known as a lover of all things pie, up until this May I had never actually tasted a Strawberry Rhubarb Pie. Shocking, I know.
My first taste of this classic was at the Old Ebbit Grill in Washington. They had a selection of desserts featuring local strawberries that could not be resisted.

After one bite I knew I had found a new love. The tart rhubarb and sweet strawberries combined to make a perfect almost jam like filling. I wanted more. So as soon as the first local strawberries appeared, I went out and bought a basket. I paid top dollar for these berries ($7 for a litre) but it was totally worth it.

Using Anna Olson’s recipe, I baked my first Strawberry Rhubarb Pie. The crust was crisp and flaky on the edges, but the base got a little soggy. Next time I think I’ll blind bake the crust for a few minutes before adding the filling. The filling was delicious, sweet and tart, just like the slice I had in Washington. Be sure the pie is completely cooled before slicing to ensure that the filling has set.

Strawberry Rhubarb Pie
Adapted slightly from here.

Crust

  • 1 1/4 cup all purpose flour
  • 1/4 tsp salt
  • 1/4 cup cold butter, grated
  • 1/4 cup cold shortening, grated
  • 1 tbsp lime juice
  • 3 to 5 tbsp ice cold water

Filling

  • 4 cups rhubarb, chopped
  • 2 cups strawberries, sliced
  • 1 cup sugar
  • 3 tbsp cornstarch
  • 1/2 tsp cardamom
  • 1/4 tsp ginger
  • pinch of salt

Crumble Topping

  • 1/4 cup unsalted butter
  • 2/3 cup all purpose flour
  • 1/2 cup sugar
  • 1/4 tsp cardamom
  • pinch of salt
  1. Make the pie crust. In a large bowl mix the flour and salt together. Using a pastry cutter or your finger tips, cut the butter and shortening into the flour until pea sized pieces of butter and shortening are formed. Add the lime juice and 3 tablespoons of ice water. Stir with a fork until the dough comes together, adding more ice water if necessary. Form the dough into a disk, cover with plastic wrap and refrigerate for 30 minutes. Once chilled, roll out the dough till 1/4 inch thick and large enough to fill a 9 inch pie plate. Place the dough in the pie plate, trim the edges and chill for another 30 minutes. 
  2. Make the filling. While the dough is chilling, mix all the filling ingredients together in a large bowl. Let sit for 30 minutes then pour into to prepared pie crust. 
  3. Make the crumb topping. In a small saucepan, brown the butter. In a small bowl mix the flour, sugar, cardamom and salt together. Pour the browned butter over the flour mixture and stir together. Pour the crumb topping over the pie filling. 
  4. Bake the pie at 400F for 20 minutes, then lower the temperature to 350F and continue baking for another 40 minutes, until the bubbles. The pie may leak, so place a baking sheet underneath the pie plate to avoid a messy oven. 
  5. Let the pie chill completely before serving (at least 3 hours)
Enjoy!

Chocolate Pear Tart

crab apple blossoms

For a few days every Spring, the crab apple tree in my parents backyard blooms with the prettiest pink flowers. After a day or two, petals start showering down until there is just one little flower left. The backyard is like a little sanctuary; surrounded by trees on all one could almost think they were in the country. Almost. I like to sit out there on the weekends with a nice cup of coffee and just enjoy the weekend, it helps take the stress of the week away.

My doctor recently told me to try not to stress. Easier said than done. He also told me to cut back on caffeine. He then went on to list things that have caffeine in them; coffee, tea, soda, chocolate…

Chocolate?

I know that chocolate has caffeine in it, but the idea of taking chocolate out of my life as a way to reduce stress just seems like madness to me. So I have decided to selectively follow his advice. I don’t eat that much chocolate, but I’m not prepared to give up what I do have.

This tart wasn’t made to intentional defy the doctors orders, but he may have put the idea of chocolate into my head. I was flipping through Martha Stewart’s New Pies and Tarts, when I came across this recipe. I had all the ingredients and it looked really easy and quick to put together so I figured I’d give it a try. I was right, it was really easy to put together, but I’m not sure it could be made without a food processor. A few drops did drip out of the tart pan, so if you decide to make this placing a baking sheet on the rack below that tart.

Basically a flourless chocolate cake with pears, this tart is intensely chocolatey. The pear and chocolate were a really nice combination, and the almond rounded all the flavours out. I did find it a little too moist, I think some of the juice from the pear seeped into the tart.

Chocolate Pear Tart

Adapted very slightly from Martha Stewart

  • 1/2 cup unsalted butter at room temperature
  • 1 cup slivered almonds
  • 3/4 cups granulated sugar
  • 3 large eggs
  • 1/3 cup cocoa powder
  • 1/2 tsp salt
  • 1 tbsp almond liqueur
  • 3 firm, ripe pears
  • 2 tbsp apricot or apple jelly
  1. Preheat the oven to 350F. Grease a 9 inch tart pan, set aside.
  2. In a food processor, combine the almonds and sugar until finely ground. Add the butter, eggs, cocoa, vanilla and almond liqueur. Process until well combined. Pour into the prepared tart pan. 
  3. Peel, core and slice the pears and place them on the tart. Bake for 45 to 50 minutes, until a tester comes out clean. Heat the jelly slightly then brush on the pears. Let the tart set for 20 minutes before removing from the pan. 
Enjoy!

Chocolate Marzipan Cake

Cake

In exactly seven months I will be living in my brand new condo. I went down to the construction site last week, the building is far from done but it is definitely a building. I’m getting pretty excited thinking about living there. I’ve been scoping out deals on line for all the things I need. I think I’ve got my couch and bed picked out, and I’m now moving on the colour schemes. What do you think of white, grey, and yellow?

I’m also getting really nervous. A downtown condo on my own is a huge deal financially. I’ve gone over the budget a million times, and even though I know I can do it I still worry. I’m good at worrying. I sometimes find myself stuck in a loop of “what ifs”. My latest solution is to give myself a firm action plan and then listen to Bob Marley. Every little thing is gonna be alright.

flowers

Of course the classic stress reliever is chocolate. This cake will calm me down even on my most anxious days. Thanks to the marzipan it’s dense and moist, and the almond flavour perfectly complements the chocolate. This recipe is also really easy to make, just be sure your ingredients are at room temperature so that the eggs and butter combine properly.

cake

Chocolate Marzipan Cake

Adapted from Anna Olson

  • 1 cup unsalted butter, room temperature
  • 1/2 cup sugar
  • 250 g marzipan
  • 6 eggs, room temperature
  • 1 tsp vanilla extract
  • 1/2 tsp almond extract
  • 1/2 cup all purpose flour
  • 1/2 cup cocoa powder
  • 3/4 tsp baking powder
  • 1/2 tsp salt
  • 1 cup whipping cream
  • 1/4 cup icing sugar
  • berries to garnish
  1. Preheat the oven to 350 F. Grease and flour a 10 inch springform pan, set aside.
  2. In a large bowl, beat the butter and sugar together until light and fluffy with an electric mixer. Break the marzipan into pieces and mix into the butter mixture until smooth.  Beat in the eggs one at a time, making sure they are well combined after each addition. Mix in the vanilla and almond extracts. 
  3. Sift the flour, cocoa, baking powder and salt. Beat into the butter mixture until well combined. 
  4. Pour the cake batter into the prepared pan. Bake for 35 to 45 minutes until a tester comes out clean. Let the cake cool in the pan for 20 minutes then turn it out onto a rack to cool completely.
  5. Whip the cream with the icing sugar until stiff, cover the cooled cake with cream. Garnish with berries. 
Enjoy!

Berry Mascarpone Almond Tart

Berry Mascarpone Tart

I’ll Have What She’s Having turns two years old this week. To be honest, I never really thought I would still be blogging at this point. I’m one of those people who moves from obsession to obsession, leaving past ones behind without much thought or regret. I think what keeps food blogging interesting for me is that it continually challenges me to learn new things. In these two years I’ve learned more about photography than I ever would have without this blog, and there is still so much to learn.
In the coming year I want to challenge myself to expand my culinary skills as well as my photography skills. I want to try new cooking techniques, attempt dishes that are “scary” (chocolate soufflé, I’m looking at you), and experiment with flavours that I normally wouldn’t use. A friend of mine recently told me that she enjoys my “style” of desserts because I tend to make things she wouldn’t normally make. I want to take that even further.

Berry Mascarpone Tart

The biggest thing that keeps me going is the responses I get from readers. Your comments encourage me, inspire me, and push me to make What She’s Having better and better. Thank you.
On the topic of comments, WordPress recently made some changes to their commenting platform. Those of you who try to comment using an email address that is linked to a WordPress or Gravatar account will have to log into your accounts before leaving a comment. This change was in response to some cases of Gravatars being hijacked for trolling. Although I understand that something needed to be done, the response was kind of like using a sledgehammer to fix a splinter. I’ve removed the requirement to leave an email address when commenting so that those of you who do not want to log don’t have to. I’m keeping my fingers crossed that I won’t end up with too much spam.

Berry Mascarpone Tart

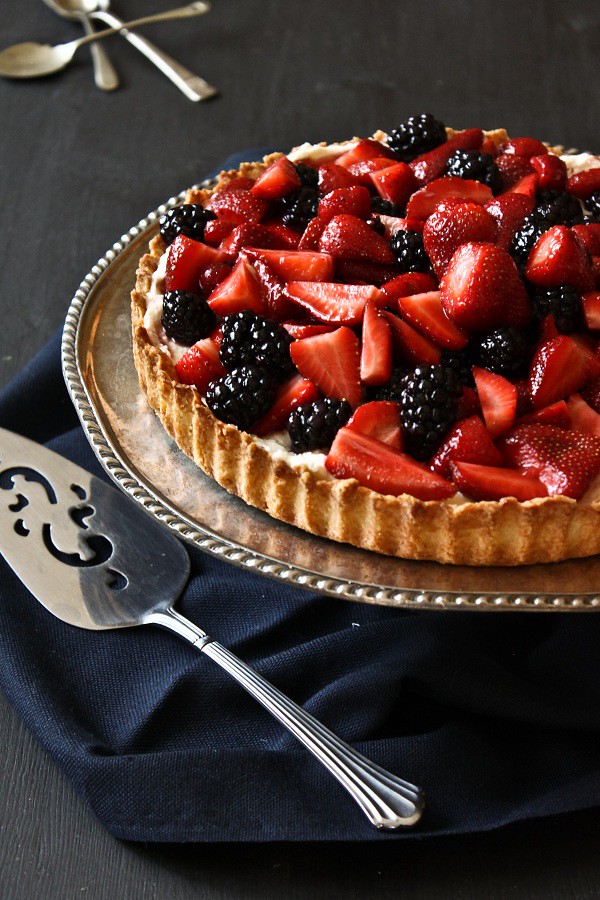
To celebrate my blogaversary, I made this Berry Mascarpone Almond Tart. It’s similar to this one I made last summer except that this time the recipe came together without any drama. The crust has a nice crunch to it from the almonds, and it’s easy to cut through. The filling is similar to a no bake cheesecake filling, creamy and rich. The amaretto flavours works really well with the berries.

Berry Mascarpone Almond Tart
Adapted from Desserts for Breakfast

Pastry Crust

  • 1 cup all-purpose flour
  • ¼ cup almond flour
  • ½ tsp. salt
  • ½ cup unsalted butter, chilled and cut into cubes
  • 1 egg yolk
  • 2-4 tbsp. ice water

Mascarpone Filling

  • 400 grams mascarpone at room temperature
  • 2 tbsp. icing sugar
  • 2 tbsp. amaretto
  • ½ cup whipping cream

Berry Topping

  • 2 cups mixed berries, cleaned
  • 2 tbsp. seedless raspberry jam

1.  Make the pastry crust: In a large bowl mix the flour, almond flour and salt together. Add the butter. Using your finger tips or a pastry cutter, rub the butter into the flour until it forms pea sized pieces of butter and holds together when squeezed. Mix in the egg yolk, and just enough water to bring the dough together. Form the dough into a disk, cover in plastic wrap, and refrigerate for at least 2 hours. Once chilled, roll out the dough to ¼ inch thick and place in a 9 inch tart pan; dock the crust (poke holes with a fork). Refrigerate the crust for 1 hour. Preheat the oven to 400F. Place a sheet of parchment paper on the crust and cover with pie weights or dried beans. Bake for 13-15 minutes, remove the pie weights and parchment and bake for an additional 3-5 minutes. Let cool completely.
2.  Make the filling: In a medium bowl, beat the mascarpone and a tablespoon of the cream together using a hand held mixer until the mascarpone is softened. Beat in the sugar and amaretto. In a separate bowl whip the cream. Fold the whipped cream into the mascarpone. Pour into the chilled tart crust.
3.  Make the berry topping: In a microwave safe bowl heat the jelly until it liquefies (about 30 seconds). Toss the berries with the jelly. Pour over the mascarpone filling. Chill the tart for at least 1 hour before serving.
Enjoy!

Citrus Salad

Citrus Salad

I’ve fallen out of the blogging beat lately. As I mentioned in my last post, long hours at the office have left me feeling drained. And uninspired. I kept trying to come up with a spectacular dish or dessert to share, but I was too tired to even think of anything. It eventually dawned on me that at times like this what I need to do is focus on simplicity.

And so I made myself this simple citrus salad. It’s perfect because 1) it’s really, really easy to make 2) it’s delicious and 3) the vitamin C will give me the boost I need to tackle more complex projects, like a sandwich.

Citrus Salad

Citrus Salad

  • 2 large oranges, sliced
  • 2 pink grapefruits, segmented (for a tutorial on segmenting check out this post at A Thought for Food
  • 2 tbsp orange juice
  • 2 tbsp wildflower honey
  • a handful of pistachios
  1. Mix the orange juice and honey together. Toss the orange slices and grapefruit segments with the pistachios and dress with the honey mixture.
Enjoy!

Felix & Norton Cakes (Review)

Have you ever been so busy at work that you become completely non functional at home? That’s what’s happened to me in the last few weeks; 10 to 12 hour work days (not including my long commute) have left me completely drained. So when Monsieur Felix and Mr. Norton showed up at my door with a new product for me to review I was more than happy to dig in.

Felix and Norton is a Montreal based company that has been enticing Canadians with decadent cookies since 1985. They pride themselves on using high quality ingredients and providing customers with products that lead to what can only be described as pure joy. I’m sure you know that I usually make my own desserts, but there are times when even the most avid baker needs a little help. And in those times, it’s good to know that there are options out there at a reasonable price that are made with high quality ingredients. Felix and Norton cookies have long been a favourite treat, so I was very excited to try their new cakes. Made with 100%, pure Belgian Chocolates and no preservatives the cakes are actually layers of Monsieur Felix and Mr Norton cookies filled with buttercream or whipped cream and chocolate chunks.

These decadent cakes come in two flavours: Ebony & Ivory and Ménage-a-Trois (shown above). Ebony & Ivory is made of three layers of chocolate cookie with layers of white chocolate butter cream and whipped cream. The Ménage-a-Trois is made of three layers of chocolate chunk cookies, and layers of milk and dark chocolate butterceam. I found the first bite of the Ebony & Ivory to be a little too sweet for my taste, but my palette must have adapted because soon I was gobbling the whole thing up.  My clear favourite was the Ménage-a-Trois, the combination of the dark and milk chocolate creams with chunks of white, milk and dark chocolate is just heavenly.

The cakes cost 14.99$ and serve 6. They are available at IGA’s across Quebec in the bakery section, along with Felix and Norton’s  line of “bake your own” cookies.

Disclosure: I was provided with these cakes in exchange for writing this post. All opinions are my own. 

Rosewater Panna Cotta with Raspberry Gelée

Rosewater Panna Cotta with Raspberry Gelee

Life is all about attitude. Whether the glass is half full or empty can really shape your life. When it comes to Valentine’s Day I had two choices; I could mope about another year without a date or I could make and enjoy some pretty heart shaped desserts. I chose pretty heart shaped desserts.

Rosewater Panna Cotta with Raspberry Gelee

Panna cotta is one of my favourite desserts. It’s incredibly easy to make, and the variations are infinite. In honour of Valentine’s Day, I chose to add a little rosewater to the cream. And of course it needed a touch of red so raspberry jelly layer had to be added. The result is a perfect combination of creamy and fruity layers, with just a hint of something floral.

Raspberries

Whatever your plans for Valentine’s Day, I wish you lots of love a little something sweet!

Rosewater Panna Cotta with Raspberry Gelée
• 2 cups frozen raspberries
• 1/3 cup sugar
• 1 tsp gelatin
• ¼ cup cold water
• 2 cups cream or milk
• 2 tsp rosewater
• ½ cup sugar
• 2 tsp gelatin
• ½ cup cold water

1. Grease the molds with an unflavoured oil. In a medium bowl, sprinkle the 1 tsp gelatin over the ¼ cup water. Set aside. In a medium saucepan bring the raspberries and the 1/3 cup sugar to a boil, then simmer for 10 minutes to release the juices. Strain, and stir the raspberry juice into the gelatin until the gelatin has completely dissolved. Pour into molds and let set in the fridge for at least one hour.
2. Once the raspberry gelée has set, make the panna cotta. In a medium bowl sprinkle the 2 tsp gelatin over the ½ cup cold water. Set aside. In a saucepan bring the cream and sugar just to boil. Add the rosewater. Stir into the gelatin until just combined. Let the cream mixture cool slightly then pour into the molds over the gelée. Let set for at least 2 hours.
3. To unmold, run a sharp knife along the edge of the mold then invert onto plates


Enjoy!

Peanut Butter Chocolate Chip Sandwich Cookies

peanut butter chocolate chip cookies

While watching a recent episode of Criminal Minds I learned that people identify most with the music they listened at the age of 14. I guess that explains why I know the lyrics to so many Ace of Base songs. And why I think Meatloafs I Would Do Anything For Love (But I Won’t Do That) is one of the greatest car singing songs of all time. 1994 was a good year in music. Remember this classic? (please note the Habs jersey in the video)

peanut butter chocolate chip cookies

Despite some awfully cheesy songs , I really do identify with the music from that year. I spent hours listening to The Cranberries, Melissa Ethridge. I think I had that Lisa Loeb song on repeat for a good 6 months (taped off the radio of course, with the inevitable announcer’s voice cutting into the song). And I’m still looking for a man like the one Salt-n-Pepa kept singing about.

peanutbutterlove

This all got me thinking about the types of food I identify with and when those connections were made. My taste in food, like my taste in music, has changed over the years. Some foods I’ll always love though, and those loves were forged way before my 14th birthday. Grilled cheese sandwiches, my moms pancake soup, stuffed vine leaves (random, I know).

Cookies and Milk

And, of course, cookies. As a kid I would have told you that the classic chocolate chip cookie could not be beat, but I would have been wrong. All you need to take chocolate chip cookies to the next level is a little peanut butter, another childhood favourite. If you want to make them out of this world, just sandwich some chocolate and peanut butter filling between two cookies. I made these for the Super Bowl under the guise of “go big or go home”, and they did not disappoint. The cookies should be a little chewy, so be careful not to over bake them or they’ll get too crisp. The recipe makes about 36 cookies, or 18 sandwiches. Recipe adapted from Bon Appetit.

Blueberry Boy Bait

Blueberry Boy Bait

Whenever we have an office potluck I bake something. And whenever I bake something the “moms” in the office always tell me I’m bonne a marrier (good to marry). They all seem to believe the idea that a way to a man’s heart is through his stomach. There is a catch to that though; for it to work I would have to actually feed someone, and I generally don’t walk around with baked goods at the ready in case I see a cute guy.

When the people at Gojee asked if I wanted to participate in a virtual potluck I first planned to make a quinoa salad, but then I realized this is my chance to serve up some baked goods on a much larger pot luck scale. The blueberries in my fridge made my decision on what to make real simple: blueberry boy bait.

Blueberry Boy Bait

This is a combination of a Smitten Kitchen recipe and one of my moms. Blueberry Boy Bait is actually a really simple cake to make, it’s basically a coffee cake like batter with a ton blueberries on top. It kind of reminds me of an upside down cake, without the upside down-ness, if that makes any sense. The original calls for a cinnamon sugar crust on the berries, but I like a streusel topping. You can use fresh or frozen blueberries, though I prefer the texture of fresh.

Starting on Thursday, January 26, check out other potluck dishes fellow gojee contributors shared. Go to gojee.com and enter “gojeepotluck” into I Crave.  You can also follow #gojeepotluck on Twitter.

Enjoy!